Sequence and Selection
We know that when we execute (run) our programs that the code within each function runs in order from the first instruction to the last instruction (top to bottom). In Computer Science we call this sequential execution or sequence for short.
In the last lesson we looked at the idea of using random numbers to make our programs less predictable, but normally we want to have more control over how our programs behave than just having them do random things. For example, sometimes we’ll want a set of instructions to run based on some condition (e.g., a user input), and a different set of instructions to run otherwise – you can think of this like having a “fork in the road” of our program. This is called selection (or decision making) in Computer Science.
Relational Operators
You may recall that Boolean values are either true or false. Decision-making in programming requires us to create what are called Boolean expressions that evaluate to either true or false. In p5.js we accomplish this by using one of 6 relational operators to compare two quantities and give us a Boolean value as the result.
| Relational Operator | Example | Description |
| > | x > 30 | greater than; e.g., x > 30 |
| < | 40 < y | less than |
| >= | x >= y | greater than or equal to |
| <= | 50 <= x | less than or equal to |
| == | key == “A” | equal to |
| != | x != width | not equal to |
You’ll notice in the examples above that the result of each comparison will either be true or false, there is no maybe! Also, note that the double == is used to compare for equality, while we use the single = for assigning a value to a variable. Don’t get them confused, they serve very different purposes.
Notice also that when there are 2 symbols (e.g., >=) that the order of those symbols matters (e.g., => is not allowed) and you should never put a space between symbols (e.g., > =) because this will also cause a syntax error.
The if Statement
Now that you know the six relational operators we can look at how to apply them. The simplest form of decision-making uses what is called an if statement. Here’s the basic structure:
if (Boolean expression) {
// code to run if the Boolean expression is *true*
}
 p5.js evaluates the Boolean expression in the parentheses following the keyword if. This will be some sort of condition using a relational operator. If the result of that condition is true then the (indented) { block } of code is run. If the Boolean expression is false then the { block } of code will not run at all and execution will continue with the line after the closing }.
Here’s an example that will draw a white rectangle when mouseX is on the left half (i.e., width/2) of the canvas, otherwise no rectangle is drawn.
|
1 2 3 4 5 6 7 8 9 10 |
function setup() { createCanvas(400, 400) } function draw() { background(220) if (mouseX < width/2) { rect(0, 0, width/2, height) } } |
The if..else Statement
Sometimes we want to execute one { block } of code if a Boolean expression is true but a different { block } of code if it is false. This is where the if..else statement comes in:
if (Boolean expression) {
// code to run if the Boolean expression is *true*
}
else {
// code to run if the Boolean expression is *false*
}
Here’s an example to demonstrate:
|
1 2 3 4 5 6 7 8 9 10 11 12 13 14 15 |
function setup() { createCanvas(400, 400) } function draw() { background(220) if (mouseX < width/2) { fill(255, 0, 0) rect(0, 0, width/2, height) } else { fill(0, 255, 0) rect(width/2, 0, width/2, height) } } |
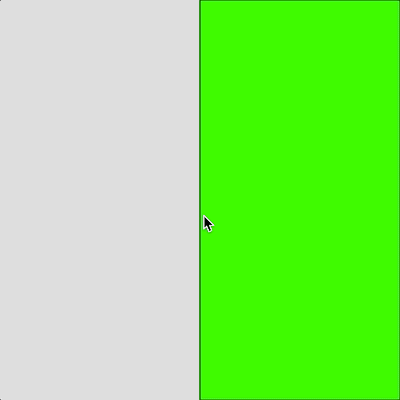 This time, if the mouse is on the left side of the canvas p5.js draws a red rectangle on the left, and otherwise, it draws a green rectangle on the right. Note that the else clause is optional, if you leave it off you have a basic if statement.
The if ..else if..else Statment
Finally, sometimes we may need to check more than one Boolean expression by adding one (or more) else if clauses like so:
if (Boolean expression #1) {
// code to run if the Boolean expression #1 is *true*
}
else if (Boolean expression #2) {
// code to run if the Boolean expression #2 is *true*
}
else if (Boolean expression #n) {
// code to run if the Boolean expression #n is *true*
}
else {
// code to run if *none* of the Boolean expressions are true
}
You can add as many else…if clauses as you need. Again, the else clause is optional, you can leave it off if your logic doesn’t require it. Here’s an example that divides the canvas into three sections this time:
|
1 2 3 4 5 6 7 8 9 10 11 12 13 14 15 16 17 18 19 |
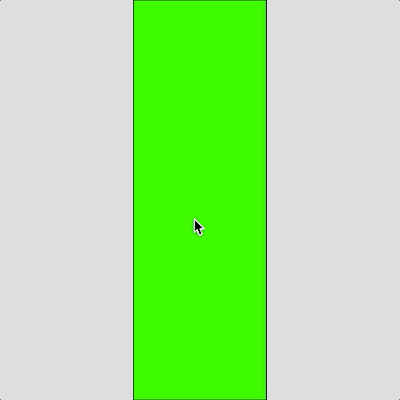
function setup() { createCanvas(400, 400) } function draw() { background(220) if (mouseX < width/3) { fill(255, 0, 0) rect(0, 0, width/3, height) } else if (mouseX < 2*width/3) { fill(0, 255, 0) rect(width/3, 0, width/3, height) } else { fill(0, 0, 255) rect(2*width/3, 0, width/3, height) } } |
Constraining Values
Let’s apply what we’ve learned to a common situation. Often in graphics and animation, we need to constrain (i.e., limit) certain values. For example, RGB values should be kept within the range 0 and 255, or we might need to constrain the coordinates of a shape to a bounding area. One way to do this is to use an if..else if statement:
|
1 2 3 4 5 6 7 8 9 10 11 12 13 14 15 16 17 18 19 20 21 22 23 24 25 26 27 28 |
let leftWall = 100 let rightWall = 300 let x = 0 function setup() { createCanvas(400, 400) } function draw() { background(220) // Draw left and right walls line(leftWall,0, leftWall, height) line(rightWall,0, rightWall, height) x = mouseX // Keep x inside the bounding walls if (x > rightWall) { x = rightWall } else if (x < leftWall) { x = leftWall } // Update our circle ellipse(x, mouseY, 50, 50) } |
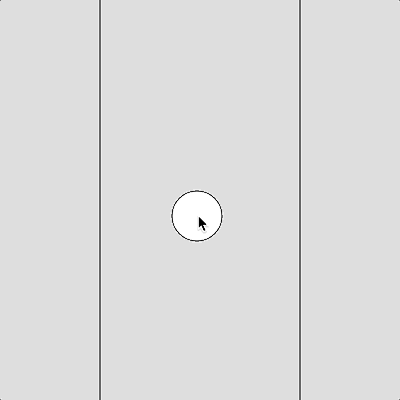 On lines 19 to 24, we check if the value of x is greater than 300 (the rightWall) and if so, we limit it to 300. Similarly, if the value is less than 100 (the leftWall), then we limit it to a minimum of 100. This if statement will ensure that the value of x is always kept between 100 and 300.
This is a common issue, and the code above works — but there’s a better way! p5.js includes a function called constrain() to simplify these 6 lines into just 1:
x = constrain(x, leftWall, rightWall)
The constrain() function takes 3 arguments. The first is a variable that contains a number to be constrained (i.e., limited), the second is the minimum limit, and the third is the maximum limit. The function returns the value of the variable, adjusted so that it is within the minimum and maximum limits. The assignment = operator stores this adjusted value back in the x variable. This one line of code ensures that x is kept between 100 and 300. Pretty handy!
Mapping Values
Related to the idea of constraining a value is mapping. Mapping means that we convert a value in a current range into a target range. Consider this code:
|
1 2 3 4 5 6 7 8 9 10 11 |
let myShade = 0 function setup() { createCanvas(400, 400) } function draw() { myShade = mouseX background(myShade) line(255, 0, 255, height) } |
 Here we use myShade to set the background color of the canvas. The problem is that the range of values for mouseX is 0..400, but the range allowed for greyscale is 0..255. I have drawn a vertical line at x=255 to help illustrate the point. As the mouse approaches that line the background gets lighter, but after the line is crossed the mouseX values become too large (i.e., > 255) and no longer lighten the background colour.
To make this more accurate we can convert the myShade value from its current range of 0..400 into a target range of 0..255. One way to do this is with a little math, replacing line 8 above with:
myShade = 255 * (mouseX / width)
The subexpression (mouseX / 400) will always give a value between 0.0 and 1.0. Multiplying this by 255 will give us a value between 0 and 255.
But there’s a better way! Shrinking and stretching numbers like this is so common in computer graphics that p5.js has a function called map() to take care of it. Try replacing line 8 with this instead:
myShade = map(mouseX, 0, width, 0, 255)
 Here the map() function takes the value of mouseX with a range of 0..width and converts it into the target range 0..255. The new mapped value is then returned by the function. If you try the code again you will see that the background shade continuously changes as the mouse moves across the full width of the canvas. Mucho bueno!
You Try!
-
- Create a p5.js animation with a cliff and a character of your choice (e.g., a car, animal). Your character should move to the edge of the cliff and then stop moving. Whew!
- Modify your Q1 animation such that when the character passes the edge of the cliff it moves downward until it stops at the bottom of the canvas. Oh no! Hint: use the constrain() function to ensure that the character does not disappear off the bottom of the Canvas area.
- Modify your Q2 animation such that the character changes in some way as it falls; for example, colour or perhaps arm or leg positions. Cool!
- Consider the following starting code:
123456789101112131415161718192021222324252627282930313233343536373839404142// These variables control the circle positioncenterX = 200;centerY = 200;function setup() {createCanvas(400, 400);}function draw() {background(220);// Draw grid linesstroke(0);line(200, 0, 200, 400);line(0, 200, 400, 200);// Draw ellipseellipse(centerX, centerY, 50, 50);// Quad 1 or 4if (mouseX > 200) {// Quad 1if (mouseY < 200) {print("Quad 1");}// Quad 4else {print("Quad 4");}}// Quad 2 or 3else if (mouseX < 200) {// Quad 3if (mouseY > 200) {print("Quad 3");}// Quad 2else {print("Quad 2");}}}
The code above is an example of nested if statements. In other words, these are if..else statements indented within another if..else structure. In this example, the quadrant that the mouse is in will be displayed in the Console area. Modify the code so that the circle moves in the general direction of the mouse. For example, if the mouse is in the bottom-right quadrant (“Quad 4”) add 1 to centerX and centerY so that the circle moves in that direction. Do something similar for the other 3 quadrants. Note: Be sure to constrain() the circle so that it does not leave the canvas area.