The Activity Lifecycle
 When you create an activity, Android calls inherited methods from the Activity class at different points in its lifecycle. For example, we know that the onCreate() method is automatically called when an app (i.e., our activity) is launched. There is more to an activity’s lifecycle than that, as shown in the diagram.
An activity is in the Running State when it’s visible to the user and has focus (i.e., the user is currently interacting with it). An activity enters the Paused State when it loses focus (i.e., it may be partially hidden by other activities or the device may have gone to sleep). When an activity is completely hidden, the app enters the Stopped State.
When an app is launched, Android calls the onCreate(), onStart(), and onResume() methods in order, such that the app enters the Running State as quickly as possible. If the activity loses focus, Android calls its onPause() method, and if it regains focus, onResume() is called again.
When an activity transitions between states (or if you change the screen orientation), Android tries to preserve the data of the activity. However, if you have many activities running (i.e., limited free memory) this may not be possible and you will lose information!
To solve this problem, we must override the onPause() method to save the most important data for our activity (i.e., our instance variables), and onResume() to load/restore the data when the activity regains focus. Android provides two classes (SharedPreferences and Editor) to handle the saving and loading of data for an activity.
Let’s enhance our Tip Calculator! Add the following imports:
|
1 2 3 |
// Import SharedPreferences and its Editor class import android.content.SharedPreferences; import android.content.SharedPreferences.Editor; |
Next, add the following private instance variable (after the tipPercentage declaration):
|
1 2 |
// Declare reference for a SharedPreferences object private SharedPreferences savedPrefs; |
Add the following line to the end of our onCreate() method:
|
1 2 |
// get SharedPreferences object savedPrefs = getSharedPreferences( "TipCalcPrefs", MODE_PRIVATE ); |
Add the following code for our onPause() method:
|
1 2 3 4 5 6 7 8 9 10 11 |
@Override public void onPause() { // Save the billAmountString and tipPercentage instance variables Editor prefsEditor = savedPrefs.edit(); prefsEditor.putString( "billAmountString", billAmountString ); prefsEditor.putInt( "tipPercentage", tipPercentage); prefsEditor.commit(); // Calling the parent onPause() must be done LAST super.onPause(); } |
The purpose of the onPause() method is to save our activity’s key instance variables. Data is saved as key:value pairs on the device. This code is important so that we don’t lose information when the device orientation changes or the user navigates away from and back to our activity.
Once we’ve saved our data, we need a way to reload it when our activity regains focus. Add the following onResume() method:
|
1 2 3 4 5 6 7 8 9 10 11 12 |
@Override public void onResume() { super.onResume(); // Load the instance variables back (or default values) billAmountString = savedPrefs.getString("billAmountString", ""); tipPercentage = savedPrefs.getInt("tipPercentage", 15); // Format/update these values in our widgets billAmountEditText.setText(billAmountString); calculateAndDisplay(); } |
This code is important because if the user navigates away from our activity and back again Android may set the displayed text back to its default values. The code above restores the values of both of our instance variables. To retrieve a value you must provide the same “key” (i.e., the first parameter) that was used to store the value in the first place. The second parameter is a default value that gets returned if for some reason the data cannot be retrieved from the device. We call calculateAndDisplay() to update the content of the billAmountString and tipPercentage widgets.
Obviously, I haven’t covered all of the methods illustrated in the activity lifecycle diagram above, but we’ve covered enough for our purposes. For complete details I strongly encourage you to have a look at the Activity class in the Android API.
Locking the Screen Orientation
Sometimes an app design just looks better in one device orientation than another. For example, if you change the orientation to landscape mode with our Tip Calculator app you’ll notice that there is a lot of blank space on the right side and our “TOTAL:” field may get covered by the soft keyboard.
It might be better if we could “lock” the orientation of our app to portrait mode. To do this, open the app > manifests > AndroidManifest.xml file. This file specifies configuration information about an app that the Android system reads before launching the app.
Add the highlighted line to the <activity> tag:
|
1 2 3 4 5 6 7 8 9 10 11 12 13 14 15 16 17 18 19 20 21 22 |
<?xml version="1.0" encoding="utf-8"?> <manifest xmlns:android="http://schemas.android.com/apk/res/android" package="com.example.vik20.tipcalculator"> <application android:allowBackup="true" android:icon="@mipmap/ic_launcher" android:label="@string/app_name" android:roundIcon="@mipmap/ic_launcher_round" android:supportsRtl="true" android:theme="@style/AppTheme"> <activity android:name=".TipCalculatorActivity" android:screenOrientation="portrait"> <intent-filter> <action android:name="android.intent.action.MAIN" /> <category android:name="android.intent.category.LAUNCHER" /> </intent-filter> </activity> </application> </manifest> |
Run the app again and try changing the orientation of the device. Problem solved!
Customizing the Launcher Icon
You’ll notice on line 7 of the AndroidManifest.xml file above that an icon is specified. If you look in the res > mipmap > ic_launcher folder you will find 5 ic_launcher.png files of various pixel densities. To change the icon for your app, you can replace those images with new ones!
If you don’t want to design your own, there are many free Android icons available online that you can download. To change the icon for your app:
- Right-click on the app > res > mipmap > ic_launcher folder.
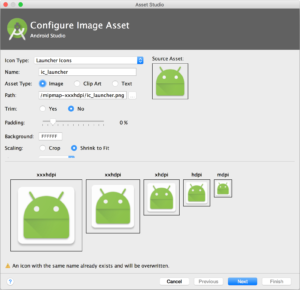
- In the pop-up menu that appears, select New, then select Image Asset. You will see the Configure Image Asset window.

- Click the ellipses (…) button beside the Path:.
- Navigate to a .png of one of the icons you downloaded and click OK.
- You should see that the icon for your app has changed. Click Next, then click Finish to confirm the change.
Android Studio includes a large collection of icon clip art that you can also choose from. To do this, select the Clip Art option beside Asset Type: in the Configure Image Asset window.
Debugging Techniques
Sometimes it can be useful to add output statements to a Java program to aid with debugging. If you use System.out.println() statements in an Android app it will display information in the Run tool window in Android Studio (not on the emulator or device). There are two better ways to display debugging information in Android.
The Log Class
The first way is to use a class called Log by adding the following import:
|
1 2 |
// Import the Log class to aid debugging import android.util.Log; |
The Log class includes 4 static methods that output to the Run tool window:

Both parameters are String values. The tag parameter is displayed first followed by the message parameter. For example, if we add:
|
1 2 |
// Display debug message in the Run/Logcat tool Log.d("onPause() method", "Just finished saving instance variables.."); |
as the last line of our onPause() method, then run the app and hide and show it you will see the message “D/onPause() method: Just finished saving instance variables..” appear in the Run tool window. Try the other methods to see how they change the output colour!
The Toast Class
The Log class is only helpful if you are running your app on an emulator or a device connected by USB. It’s also possible to display a brief message (called a “toast”) in the user interface of your app. To do this, start by importing the Toast class:
|
1 2 |
// Import the Toast class to aid debugging import android.widget.Toast; |
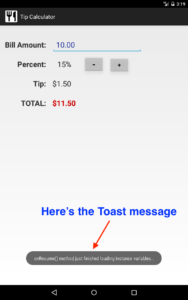
To demonstrate how this works, add the following line to the end of the onResume() method:
|
1 2 3 |
// Display debug message in our app's UI Toast.makeText( this, "onResume() method just finished loading instance variables..", Toast.LENGTH_LONG).show(); |
 The LENGTH_LONG constant displays the message for a long period of time, and there is also a LENGTH_SHORT constant to display the message very briefly. If you run the app you’ll see a message like this whenever the onResume() method is called.
You Try!
- In 5-3 you started working on a coin/change calculator or a magic number guessing game app. Apply what you’ve learned about the activity lifecycle to save and restore important instance variables, lock the orientation for your app, and change its icon.
- Experiment with the Log and Toast classes. Add some debug output to your new app.