 At this point you should be getting comfortable with navigating Android Studio and using the basic tools it provides to build a user interface for an app.
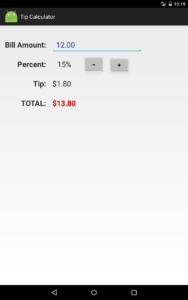
For our next app, let’s make an interactive “Tip Calculator” that will look like this –>
Yes, it’s a pretty plain looking app, but it demonstrates a lot of important ideas in Android development. I’ll leave it as an exercise for you to make it look better!
Creating a New Project
- Start a new Android Studio project.
- For the Application name: use “Tip Calculator”. Leave the defaults for everything else and keep clicking Next until you get to the Add an Activity to Mobile Choose Empty Activity (not Basic Activity) and click Next.
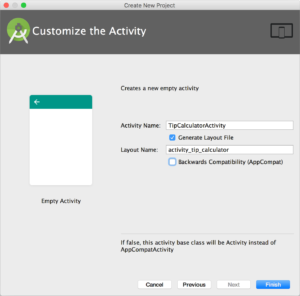
 On the Customize the Activity screen, for Activity Name: use “TipCalculatorActivity”. Don’t forget to uncheck Backwards Compatibility (AppCompat). Click Finish and Android Studio will build the new project.
Designing the User Interface
Stop! It’s always tempting to jump in and start building an interface or writing code, but professionals know that this always leads to extra work in the end. It’s much better to sit down and plan things out on paper first so that we can think through how the interface should look and how the components will interact with each other in terms of their logic. Also, even though this app is pretty simple, it involves a lot of different widgets, each of which need an ID (and a string resource associated with it) so that we can refer to them in our code.
To help us manage all of these details, and to have a clear picture of what we are building in front of us, I’ve sketched out the UI for the app.

The actual widgets are shown in black. For each widget, I’ve labeled their ID property in red and their string resource name in blue. This design sketch will be very helpful when we are writing our code and need to remember the name of a particular element of our UI.
For good style (and your own sanity!) it’s important to come up with a consistent naming convention for your widgets. Above, I’m using the suffix “Label” for TextView widgets that will contain static text and “TextView” for TextView widgets that contain text that will change when the app is running. For string resource names I am using pot_hole_case to differentiate them from widget IDs (using camelCase). The main point here is to come up with a naming system that makes sense and be consistent about using it.
Creating the User Interface
Now that we have a clear picture of the widgets required for our app and how they will be placed relative to each other, we can use the graphical editor to build the user interface.
 Delete the default “Hello World” TextView widget from the interface.
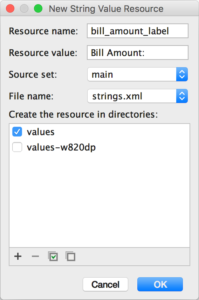
- Drag and drop a TextView widget to the upper-left side of the visual layout. Set its ID to billAmountLabel to match our design sketch. Define a new bill_amount_label string resource for its text property as shown –>
- Repeat step 2 for all of the other 6 TextView widgets to match our design sketch: percentLabel, tipLabel, totalLabel, percentTextView, tipTextView, and totalTextView.
| TextView ID | String Resource Name | String Resource Value |
| billAmountLabel | bill_amount_label | “Bill Amount:” |
| percentLabel | percent_label | “Percent:” |
| tipLabel | tip_label | “Tip:” |
| totalLabel | total_label | “TOTAL:” |
| percentTextView | percent_amount | “15%” |
| tipTextView | tip_amount | “$0.00” |
| totalTextView | total_amount | “$0.00” |
-
- Next we need to add our interactive widgets. The user will enter the amount of the bill using an EditText widget. In the Palette tool window, in the Text group, drag a Number (Decimal) widget to the visual layout beside the billAmountLabel. Set the ID to billAmountEditText, and set its text property to a new bill_amount string resource with a value of “0.00”.
- Finally, we need to add two buttons beside the percentTextView. Drag and drop 2 Button widgets from Buttons group in the Palette tool window to the right of the percentTextView widget in our layout. Set their ID properties to decreaseButton and increaseButton, and create “-“ (decrease_label) and “+” (increase_label) string resources for their text properties, respectively.
- To finish up, make sure to constrain the top and left sides of all of your widgets relative to each other or they will appear to overlap when you run the app.
- Once your initial layout is complete, try running the app! You can actually interact with the billAmountEditText, decreaseButton, and increaseButton widgets but they won’t actually do anything (yet).
At this point you will have a pretty (ugly) interface for the app. The key points are that all of the widgets from the design sketch have been added to the layout, that we have properly named them, and that we have created/associated string resources for them.
Layout XML Code
Below is the XML code (at this point) for our Tip Calculator app. Consider this a guideline only! Your XML will likely be different depending on how you defined the positions of the widgets relative to each other. The main thing is that you have 7 TextView, 1 EditText, and 2 Button widgets defined, and that their android:text= and android:id= properties match our design sketch. (You can scroll the code below, or click to expand it.)
|
1 2 3 4 5 6 7 8 9 10 11 12 13 14 15 16 17 18 19 20 21 22 23 24 25 26 27 28 29 30 31 32 33 34 35 36 37 38 39 40 41 42 43 44 45 46 47 48 49 50 51 52 53 54 55 56 57 58 59 60 61 62 63 64 65 66 67 68 69 70 71 72 73 74 75 76 77 78 79 80 81 82 83 84 85 86 87 88 89 90 91 92 93 94 95 96 97 98 99 100 101 102 103 104 105 106 107 108 109 110 111 112 113 114 115 116 |
<?xml version="1.0" encoding="utf-8"?> <android.support.constraint.ConstraintLayout xmlns:android="http://schemas.android.com/apk/res/android" xmlns:app="http://schemas.android.com/apk/res-auto" xmlns:tools="http://schemas.android.com/tools" android:layout_width="match_parent" android:layout_height="match_parent" tools:context=".TipCalculatorActivity"> <TextView android:id="@+id/billAmountLabel" android:layout_width="wrap_content" android:layout_height="wrap_content" android:layout_marginLeft="36dp" android:layout_marginStart="36dp" android:layout_marginTop="72dp" android:text="@string/bill_amount_label" app:layout_constraintStart_toStartOf="parent" app:layout_constraintTop_toTopOf="parent" /> <TextView android:id="@+id/percentLabel" android:layout_width="wrap_content" android:layout_height="wrap_content" android:layout_marginLeft="59dp" android:layout_marginStart="59dp" android:layout_marginTop="20dp" android:text="@string/percent_label" app:layout_constraintStart_toStartOf="parent" app:layout_constraintTop_toBottomOf="@+id/billAmountLabel" /> <TextView android:id="@+id/tipLabel" android:layout_width="wrap_content" android:layout_height="wrap_content" android:layout_marginLeft="89dp" android:layout_marginStart="89dp" android:layout_marginTop="18dp" android:text="@string/tip_label" app:layout_constraintStart_toStartOf="parent" app:layout_constraintTop_toBottomOf="@+id/percentLabel" /> <TextView android:id="@+id/totalLabel" android:layout_width="wrap_content" android:layout_height="wrap_content" android:layout_marginLeft="65dp" android:layout_marginStart="65dp" android:layout_marginTop="16dp" android:text="@string/total_label" app:layout_constraintStart_toStartOf="parent" app:layout_constraintTop_toBottomOf="@+id/tipLabel" /> <TextView android:id="@+id/percentTextView" android:layout_width="wrap_content" android:layout_height="wrap_content" android:layout_marginLeft="15dp" android:layout_marginStart="15dp" android:layout_marginTop="12dp" android:text="@string/percent_amount" app:layout_constraintStart_toEndOf="@+id/percentLabel" app:layout_constraintTop_toBottomOf="@+id/billAmountEditText" /> <TextView android:id="@+id/tipTextView" android:layout_width="wrap_content" android:layout_height="wrap_content" android:layout_marginLeft="15dp" android:layout_marginStart="15dp" android:layout_marginTop="18dp" android:text="@string/tip_amount" app:layout_constraintStart_toEndOf="@+id/tipLabel" app:layout_constraintTop_toBottomOf="@+id/percentTextView" /> <TextView android:id="@+id/totalTextView" android:layout_width="wrap_content" android:layout_height="wrap_content" android:layout_marginLeft="14dp" android:layout_marginStart="14dp" android:layout_marginTop="17dp" android:text="@string/total_amount" app:layout_constraintStart_toEndOf="@+id/totalLabel" app:layout_constraintTop_toBottomOf="@+id/tipTextView" /> <EditText android:id="@+id/billAmountEditText" android:layout_width="wrap_content" android:layout_height="wrap_content" android:layout_marginLeft="8dp" android:layout_marginStart="8dp" android:layout_marginTop="61dp" android:ems="10" android:inputType="numberDecimal" android:text="@string/bill_amount" app:layout_constraintStart_toEndOf="@+id/billAmountLabel" app:layout_constraintTop_toTopOf="parent" /> <Button android:id="@+id/decreaseButton" android:layout_width="51dp" android:layout_height="39dp" android:layout_marginLeft="80dp" android:layout_marginStart="80dp" android:text="@string/decrease_label" app:layout_constraintStart_toEndOf="@+id/percentTextView" app:layout_constraintTop_toBottomOf="@+id/billAmountEditText" /> <Button android:id="@+id/increaseButton" android:layout_width="53dp" android:layout_height="39dp" android:text="@string/increase_label" app:layout_constraintStart_toEndOf="@+id/decreaseButton" app:layout_constraintTop_toBottomOf="@+id/billAmountEditText" /> </android.support.constraint.ConstraintLayout> |
Strings XML Code
Your app > res > values > strings.xml file should contain exactly these values, although the order might be different:
|
1 2 3 4 5 6 7 8 9 10 11 12 13 |
<resources> <string name="app_name">Tip Calculator</string> <string name="bill_amount_label">Bill Amount:</string> <string name="percent_label">Percent:</string> <string name="tip_label">Tip:</string> <string name="total_label">TOTAL:</string> <string name="percent_amount">15%</string> <string name="tip_amount">$0.00</string> <string name="total_amount">$0.00</string> <string name="bill_amount">0.00</string> <string name="decrease_label">-</string> <string name="increase_label">+</string> </resources> |
Double check that the name= property of each string matches our design sketch.
Java Code
Time for some Java!
Open the TipCalculatorActivity.java file. It may already be available in a tab, if not you’ll find it in the app > java folder within a package for your app. You’ll see the default starting code:
|
1 2 3 4 5 6 7 8 9 10 11 12 13 14 15 |
package com.example.vik20.tipcalculator; import android.app.Activity; import android.os.Bundle; public class TipCalculatorActivity extends Activity { @Override protected void onCreate(Bundle savedInstanceState) { super.onCreate(savedInstanceState); setContentView(R.layout.activity_tip_calculator); // Our Custom Code Will Start Here... } } |
This class is created for you automatically when you start an app based on the Empty Activity template. In Android, an activity defines one “screen” of your app. Most apps consist of several activities, but we only have one so far.
On line 6, to define a custom activity, our TipCalculatorActivity class inherits from a class called Activity. When an activity is started, Android automatically calls its onCreate() method and passes in a Bundle object. The Bundle object is used to pass data between multiple activities – we’ll get into the details of this later. Since we are creating a custom activity, we need to override the onCreate() method.
Line 10 ensures that the Bundle object is passed along to the parent onCreate() method first. The setContentView() method is called to specify the layout for our activity. Android Studio automatically maintains a special class called R (i.e., Resources) that provides a way to access the widgets and strings defined in our XML within our Java code. On line 11, the R.layout.activity_tip_calculator refers to the activity_tip_calculator.xml file in our res > layout folder.
After these two lines is where we will add our custom code.
Referencing Our Widgets
In order to access the widgets in our application we need to declare and initialize reference variables for them:
|
1 2 3 4 5 6 7 8 9 10 11 12 13 14 15 16 17 18 19 20 21 22 23 24 25 26 27 28 29 30 31 32 33 34 35 36 37 38 39 40 41 42 43 44 45 46 47 48 49 50 51 52 53 54 55 56 57 58 59 60 |
package com.example.vik20.tipcalculator; import android.app.Activity; import android.os.Bundle; // Import our Widget classes import android.view.View; import android.widget.EditText; import android.widget.TextView; import android.widget.Button; import java.text.NumberFormat; public class TipCalculatorActivity extends Activity { // Declare reference variables for our widgets private EditText billAmountEditText; private TextView percentTextView; private TextView tipTextView; private TextView totalTextView; private Button decreaseButton; private Button increaseButton; // Our event handlers will be sharing these private String billAmountString = "0.00"; private int tipPercentage = 15; @Override protected void onCreate(Bundle savedInstanceState) { super.onCreate(savedInstanceState); setContentView(R.layout.activity_tip_calculator); // Initialize our widget reference variables billAmountEditText = findViewById(R.id.billAmountEditText); percentTextView = findViewById(R.id.percentTextView); tipTextView = findViewById(R.id.tipTextView); totalTextView = findViewById(R.id.totalTextView); decreaseButton = findViewById(R.id.decreaseButton); increaseButton = findViewById(R.id.increaseButton); // Update the percent, tip, and total TextView widgets based on the billAmountEditText calculateAndDisplay(); } private void calculateAndDisplay() { // We will use locale-specific formatting for currency and percentage NumberFormat currencyFormat = NumberFormat.getCurrencyInstance(); NumberFormat percentFormat = NumberFormat.getPercentInstance(); // Get the billAmountEditText and convert it to a double billAmountString = billAmountEditText.getText().toString(); double billAmount = (billAmountString.equals("") ? 0.0 : Double.parseDouble(billAmountString)); // Recalculate the tip and total double tipAmount = billAmount * (tipPercentage / 100.0); double totalAmount = billAmount + tipAmount; // Display the results with locale-specific formatting percentTextView.setText(percentFormat.format(tipPercentage / 100.0)); tipTextView.setText(currencyFormat.format(tipAmount)); totalTextView.setText(currencyFormat.format(totalAmount)); } } |
On lines 7 to 9, we import classes from the android.widgets package corresponding to the three types of widgets in our app. We will use the NumberFormat class (line 10) for locale-specific currency and percent formatting.
On lines 14 to 19 we declare private reference variables that we will use in our Java code to access the widgets defined in our layout. It’s common to use the same names for these variables as the widget ID properties we set in the visual editor, but technically you can name them differently.
On lines 31 to 36 we use the findViewById() method, using the R class to obtain a reference to a particular widget in our interface by its ID.
Finally, line 39 calls the calculateAndDisplay() helper method to update the percentTextView, tipTextView, and totalTextView widgets based on the contents of the billAmountEditText widget. Within this method, you can see how the methods getText() and setText() are used to access the contents of our widgets. Since these widgets only store String values, we need to convert to and from double values to make calculations. The getText() method returns an Editable object that represents the text that the widget contains. To get a String from this we need to use its toString() method. Also note the use of the NumberFormat class here to format our currency and percentage values in a locale-specific way. We could have used String.format() instead, but this way our app will automatically adjust its number formatting for different countries.
Adding Event Handling
We’re almost there! You’ll recall from learning Swing that an event occurs when a user interacts with a widget. To deal with an event we need to associate the widget with an event listener object that implements a method to handle the event. This works the same way with Android development.
First, we need to import the necessary interfaces. An EditorAction event occurs when a user enters information into an EditText widget, and a Click event occurs when the user clicks on a Button widget.
Add the following imports to the code:
|
1 2 3 4 5 |
// Import Event handling classes for Button and EditText widgets import android.view.View.OnClickListener; import android.widget.TextView.OnEditorActionListener; import android.view.KeyEvent; import android.view.inputmethod.EditorInfo; |
Next, add the following inner class to handle changes to our billAmountEditText widget:
|
1 2 3 4 5 6 7 8 9 |
class BillAmountListener implements OnEditorActionListener { @Override public boolean onEditorAction(TextView v, int actionId, KeyEvent event) { if ( actionId == EditorInfo.IME_ACTION_DONE ) { calculateAndDisplay(); } return false; } } |
This class implements the onEditorActionListener interface, which requires us to override the onEditorAction() method. Android will call this method automatically when an event occurs. If you have more than one EditText widget, you can use the first parameter (TextView v) to determine which widget triggered the event (EditText is a subclass of TextView). The second parameter indicates what the user did in the EditText. The constant IME_ACTION_DONE means that the user has finished updating the text (i.e., closed the soft keyboard). In this case, we call our calculateAndDisplay() helper method to reflect the changes. Returning false causes the soft keyboard to be hidden after the event; returning true will keep it open.
Now add the following inner class to handle Button events:
|
1 2 3 4 5 6 7 8 9 10 11 12 13 14 15 |
class ButtonListener implements OnClickListener { @Override public void onClick( View v ) { if (v.getId() == R.id.decreaseButton) { tipPercentage -= 1; if (tipPercentage < 0) tipPercentage = 0; } else if (v.getId() == R.id.increaseButton) { tipPercentage += 1; if (tipPercentage > 100) tipPercentage = 100; } calculateAndDisplay(); } } |
The onClick() method will be called when our decreaseButton or increaseButton widgets are pressed. Because both buttons will share the same event listener object, we use the getId() method to determine which Button widget was clicked on and update the tipPercentage accordingly. Again, the calculateAndDisplay() method is called to reflect the new tip amount.
Finally, we need to associate our widgets with these event handlers, just as we did with Swing. To do this, add the following lines to the end of our onCreate() method.
|
1 2 3 4 5 |
// Set the event listeners for our interactive widgets billAmountEditText.setOnEditorActionListener( new BillAmountListener() ); OnClickListener buttonEventListener = new ButtonListener(); decreaseButton.setOnClickListener( buttonEventListener ); increaseButton.setOnClickListener( buttonEventListener ); |
Test the app again — if you’ve followed the instructions above carefully you should have a working, interactive app and a decent understanding of the Java code required to make it work!
You Try!
- Carefully read and follow the instructions above to build and test your own Tip Calculator app.
- Get creative! Experiment with the widget properties (e.g., text sizes, styles, colours, and padding etc..) to make your app look more attractive.
- Enhance the Tip Calculator app by adding a “Tax:” field between “Tip:” and “TOTAL:”. Assume the tax rate is 13% and will not change. The tip and tax are calculated independently based on the bill amount. For example, if the bill is $10.00, a 15% tip would be $1.50, the 13% tax would be $1.30, and the TOTAL should be $12.80.
- In U4-4 you implemented a coin/change calculator and a magic number guessing game using Swing. Choose one of these Swing apps and redesign it as an Android app!