Layout managers are used to organize widgets so that you don’t have to specify the exact arrangement and positioning of every GUI component, especially as the window is resized. This allows us to focus on the basic look-and-feel of our interface, but lets the layout manager handle most of the pesky details.
Today we’ll look at three commonly used layout managers, then talk about how to create more complex user interfaces by nesting them.

Let’s study each one with a good example.
FlowLayout Manager
 FlowLayout is the simplest layout manager, and the default for JPanel objects. Using FlowLayout, GUI components are arranged in a container from left to right in the order in which they are added. When the edge of the container (e.g., JFrame or JPanel) is reached, the components continue to display on the next line. Components may be left-aligned, centered (the default), and right-aligned.
The following example includes three JButtons to demonstrate the different ways that widgets can be aligned using FlowLayout. When you test it, try resizing the window to see how the widgets are automatically “re-flowed” within the window.
|
1 2 3 4 5 6 7 8 9 10 11 12 13 14 15 16 17 18 19 20 21 22 23 24 25 26 27 28 29 30 31 32 33 34 35 36 37 38 39 40 41 42 43 44 45 46 47 48 49 50 51 52 53 54 55 56 57 58 59 |
import javax.swing.JFrame; import javax.swing.JButton; import java.awt.FlowLayout; import java.awt.event.ActionListener; import java.awt.event.ActionEvent; public class FlowLayoutFrame extends JFrame { private FlowLayout layout; private JButton leftJButton; private JButton centerJButton; private JButton rightJButton; // set up GUI and register button listeners public FlowLayoutFrame() { super( "FlowLayout Demo" ); // Switch from default BorderLayout to FlowLayout layout = new FlowLayout(); setLayout( layout ); // Create a ButtonEventListener object (to be shared by all 3 buttons) ActionListener buttonListener = new ButtonEventListener(); // Create leftJButton and set its event handler leftJButton = new JButton( "Left" ); leftJButton.addActionListener( buttonListener ); add( leftJButton ); // Create centerJButton and set its event handler centerJButton = new JButton( "Center" ); centerJButton.addActionListener( buttonListener ); add( centerJButton ); // Create rightJButton and set its event handler rightJButton = new JButton( "Right" ); rightJButton.addActionListener( buttonListener ); add( rightJButton ); } // Here is the inner class for event handling class ButtonEventListener implements ActionListener { // We override the actionPerformed() method as required by the ActionListener Interface @Override public void actionPerformed( ActionEvent e ) { // Change the alignment depending on which button was clicked if ( e.getSource() == leftJButton ) { layout.setAlignment( FlowLayout.LEFT ); } else if ( e.getSource() == centerJButton ) { layout.setAlignment( FlowLayout.CENTER ); } else { layout.setAlignment( FlowLayout.RIGHT ); } // Tell the FlowLayout manager to layout the content area of the window again using new alignment. layout.layoutContainer( getContentPane() ); } } } |
On line 3 we import the FlowLayout class. As we’ve done before, lines 18 and 19 switch from the default BorderLayout manager (more on this next) to the FlowLayout manager. Lines 47, 50, and 53 tell the FlowLayout manager to change the alignment using the setAlignment() method with constants from the FlowLayout class. Once the alignment is set, line 56 tells the FlowLayout manager to re-layout the content area of the window.
Finally, here’s a program to test the code above:
|
1 2 3 4 5 6 7 8 9 10 11 |
import javax.swing.JFrame; public class FlowLayoutTest { public static void main( String[] args ) { FlowLayoutFrame appWindow = new FlowLayoutFrame(); appWindow.setSize( 400, 100 ); appWindow.setDefaultCloseOperation( JFrame.EXIT_ON_CLOSE ); appWindow.setVisible( true ); } } |
BorderLayout Manager
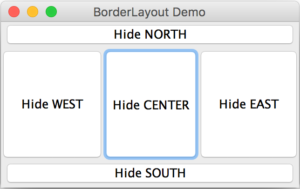 The BorderLayout manager is the default manager for a JFrame, and it arranges components into five regions represented by the constants NORTH, SOUTH, EAST, WEST, and CENTER in the BorderLayout class.
The main limitation of BorderLayout is that it only allows one component per region. If you put more than one widget into a single region, only the last one that you added will appear. We’ll talk about how to get around this limitation shortly.
It’s important to specify which region you’d like to add() a component to, otherwise CENTER is assumed by default. The NORTH and SOUTH regions will be sized so that they are tall enough to accommodate whatever component is placed within them. Similarly, the WEST and EAST regions will be sized so that they are wide enough for their components. The CENTER region gets whatever space is left over and expands or contracts as the window is resized.
|
1 2 3 4 5 6 7 8 9 10 11 12 13 14 15 16 17 18 19 20 21 22 23 24 25 26 27 28 29 30 31 32 33 34 35 36 37 38 39 40 41 42 43 44 45 46 47 48 |
import javax.swing.JFrame; import javax.swing.JButton; import java.awt.BorderLayout; import java.awt.event.ActionListener; import java.awt.event.ActionEvent; public class BorderLayoutFrame extends JFrame { private JButton[] buttons; public BorderLayoutFrame() { super( "BorderLayout Demo" ); // Create array for button names and to store references for JButton widgets String[] names = { "Hide NORTH", "Hide SOUTH", "Hide EAST", "Hide WEST", "Hide CENTER" }; buttons = new JButton[ names.length ]; // Create a ButtonEventListener object (to be shared by all 3 buttons) ActionListener buttonListener = new ButtonEventListener(); // Create JButtons and register our event listener for each for ( int count = 0; count < names.length; count++ ) { buttons[ count ] = new JButton( names[ count ] ); buttons[ count ].addActionListener( buttonListener ); } // Add button to each region of the BorderLayout add( buttons[ 0 ], BorderLayout.NORTH ); add( buttons[ 1 ], BorderLayout.SOUTH ); add( buttons[ 2 ], BorderLayout.EAST ); add( buttons[ 3 ], BorderLayout.WEST ); add( buttons[ 4 ], BorderLayout.CENTER ); } // Here is the inner class for event handling class ButtonEventListener implements ActionListener { // We override the actionPerformed() method as required by the ActionListener Interface @Override public void actionPerformed( ActionEvent e ) { // Figure out which of our 5 buttons was clicked, hide it, and make all others visible. for ( JButton button : buttons ) { if ( e.getSource() == button ) button.setVisible( false ); // hide button clicked else button.setVisible( true ); // show all other buttons } } } } |
Since the BorderLayout manager is the default manager for any JFrame, we did not have to instantiate a BorderLayout object or use the setLayout() method. Line 18 instantiates a ButtonEventListener object that we will soon associate with the 5 JButtons. The code within the actionPerformed() method uses the getSource() method to figure out which of the 5 JButtons were clicked, makes the button in that region invisible, and all of the other buttons visible.
Lines 21 to 24 simply instantiate 5 JButtons, and associate them all with the same ButtonEventListener object. Lastly, lines 27 to 31 add each JButton from the array into a different region of the BorderLayout. Be careful, if you don’t specify a region to add() a component, BorderLayout.CENTER is assumed by default.
Here is a test class:
|
1 2 3 4 5 6 7 8 9 10 11 |
import javax.swing.JFrame; public class BorderLayoutTest { public static void main( String[] args ) { BorderLayoutFrame appWindow = new BorderLayoutFrame(); appWindow.setSize( 320, 200 ); appWindow.setDefaultCloseOperation( JFrame.EXIT_ON_CLOSE ); appWindow.setVisible( true ); } } |
Make sure to test the code above. Try resizing the window so you can see how the BorderLayout manager automatically resizes each of its 5 regions. Try clicking the buttons to hide different regions. What do you notice when you click to hide the center region?
GridLayout Manager
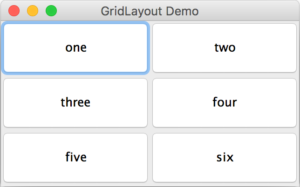 The GridLayout manager allows us to arrange widgets into rows and columns, like a table. Each “cell” in the grid may only hold one component, and all cells have the same width and height. The add() method adds widgets into the grid in order, from left to right and top to bottom, as you would read.
Here’s an example that alternates between two different GridLayout configurations. The first layout has 3 rows and 2 columns, the second layout has 2 rows and 3 columns and includes some extra spacing between the cells.
|
1 2 3 4 5 6 7 8 9 10 11 12 13 14 15 16 17 18 19 20 21 22 23 24 25 26 27 28 29 30 31 32 33 34 35 36 37 38 39 40 41 42 43 44 45 46 47 48 49 50 51 52 53 54 |
import javax.swing.JFrame; import javax.swing.JButton; import java.awt.GridLayout; import java.awt.event.ActionListener; import java.awt.event.ActionEvent; public class GridLayoutFrame extends JFrame { private boolean toggle = true; private GridLayout gridLayout1; private GridLayout gridLayout2; public GridLayoutFrame() { super( "GridLayout Demo" ); // Create array for button names and to store references for JButton widgets String[] names = { "one", "two", "three", "four", "five", "six" }; JButton[] buttons = new JButton[ names.length ]; // We will alternate between a 2x3 and 3x2 grid layout when any button is clicked. gridLayout1 = new GridLayout( 3, 2 ); // 3 rows x 2 columns; no gaps between grid cells gridLayout2 = new GridLayout( 2, 3, 5, 5 ); // 2 rows x 3 columns; 5 pixel gaps between cells // Start with our first GridLayout setLayout( gridLayout1 ); // Create a ButtonEventListener object (to be shared by all 3 buttons) ActionListener buttonListener = new ButtonEventListener(); // Associate buttons with event handler object and add them to grid (left->right, top->bottom) for ( int count = 0; count < names.length; count++ ) { buttons[ count ] = new JButton( names[ count ] ); buttons[ count ].addActionListener( buttonListener ); add( buttons[ count ] ); } } // Here is the inner class for event handling class ButtonEventListener implements ActionListener { // We override the actionPerformed() method as required by the ActionListener Interface @Override public void actionPerformed( ActionEvent e ) { // Using toggle flag, we alternate between 2 different GridLayouts if ( toggle ) { setLayout( gridLayout2 ); gridLayout2.layoutContainer( getContentPane() ); } else { setLayout( gridLayout1 ); gridLayout1.layoutContainer( getContentPane() ); } // Reverse the toggle flag toggle = !toggle; } } } |
The GridLayout class is imported on line 3. On lines 20 and 21 we are creating two different GridLayout manager objects. The first has 3 rows and 2 columns and the second has 2 rows and 3 columns; i.e., both layouts can accommodate 6 widgets. The second layout also specifies a horizontal and vertical gap between cells of 5 pixels, respectively.
Lines 30 to 34 instantiate 6 JButtons, associates them with a shared event handler, and adds them to the grid layout. With GridLayout, components are added from left to right, and top to bottom (as you would read). The actionPerformed() method (lines 41 to 52) simply switches between gridLayout1 and gridLayout2 when an event occurs. In each case, after switching the layout, we must call the layoutContainer() method to reflect the change in the JFrame.
Here is the test class:
|
1 2 3 4 5 6 7 8 9 10 11 |
import javax.swing.JFrame; public class GridLayoutTest { public static void main( String[] args ) { GridLayoutFrame gridLayoutFrame = new GridLayoutFrame(); gridLayoutFrame.setSize( 320, 200 ); gridLayoutFrame.setDefaultCloseOperation( JFrame.EXIT_ON_CLOSE ); gridLayoutFrame.setVisible( true ); } } |
Nested Layouts
 As mentioned, a significant limitation of both the BorderLayout and GridLayout managers is that only one component can be placed in a region or cell at a time. This limitation makes it hard to create more complex (and useful!) interfaces.
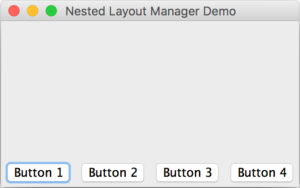
One trick to getting around this is to use more JPanel components. Each JPanel can have it’s own layout manager, and thus can contain more than one component. When you add a JPanel to a region of the BorderLayout or a cell of the GridLayout, the JPanel only counts as one component, even though it might contain many widgets. Conceptually, you can think of this as “nesting” layout managers to achieve more intricate layouts.
Here is an example that creates a JPanel with a 1 row by 4 column GridLayout. A button is added to each of the 4 cells of the grid. The JPanel is then added (as a single component) to the SOUTH region of a JFrame. This “trick” allows us to put more than one button in a BorderLayout region.
|
1 2 3 4 5 6 7 8 9 10 11 12 13 14 15 16 17 18 19 20 21 22 23 24 25 26 27 28 29 30 |
import javax.swing.JFrame; import java.awt.GridLayout; import java.awt.BorderLayout; import javax.swing.JPanel; import javax.swing.JButton; public class NestedLayoutFrame extends JFrame { public NestedLayoutFrame() { super( "Nested Layout Manager Demo" ); // Note: The default layout manager for a JFrame is BorderLayout // We will add 4 buttons to the SOUTH region of this JFrame JButton[] buttons = new JButton[ 4 ]; // Create a JPanel with a 1 row x 4 column GridLayout JPanel buttonJPanel = new JPanel(); buttonJPanel.setLayout( new GridLayout( 1, buttons.length ) ); // Instantiate and add buttons to our buttonJPanel for ( int count = 0; count < buttons.length; count++ ) { buttons[ count ] = new JButton( "Button " + ( count + 1 ) ); buttonJPanel.add( buttons[ count ] ); // add button to panel } // end for // Here's the trick! // Add the JPanel (containing 4 buttons) to the SOUTH region of the JFrame add( buttonJPanel, BorderLayout.SOUTH ); } } |
The code above is focused on demonstrating nested layout managers so I have not included any event handling code for the buttons. Here is the test class:
|
1 2 3 4 5 6 7 8 9 10 11 |
import javax.swing.JFrame; public class NestedLayoutFrameTest { public static void main( String[] args ) { NestedLayoutFrame nestedLayoutFrame = new NestedLayoutFrame(); nestedLayoutFrame.setSize( 400, 200 ); nestedLayoutFrame.setDefaultCloseOperation( JFrame.EXIT_ON_CLOSE ); nestedLayoutFrame.setVisible( true ); } } |
You Try!
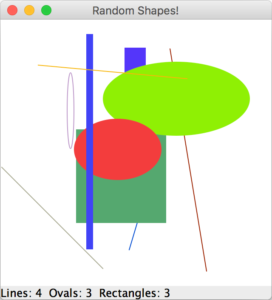 Let’s revisit your solution to 4-2 Q1 — your GUI that draws 10 random shapes. Modify your solution so that it includes a status JLabel at the bottom of the window that displays the number of lines, ovals, and rectangle objects that have been drawn.Hints: Consider adding instance variables to your DrawPanel class to keep track of the number of each type of shape created by the DrawPanel constructor. Add a toString() method to your DrawPanel class to generate the status label text, and then display this string in a JLabel in the SOUTH region of your JFrame.
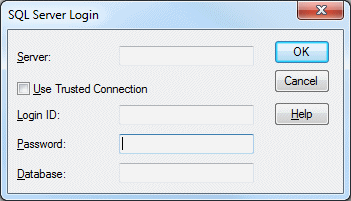
- Using everything we have learned about Swing so far, try to reproduce (as best you can) the login dialog below. It does not need to be functional; i.e., no event handling is required. For the Password: field, use a JPasswordField component (research this in the Java API).
