The Road Ahead
When I started coding as a kid in the 1980s most computer applications had text-based interfaces. Even games offered very primitive graphics with few colours. The introduction of the Macintosh in 1984 (and soon after, Microsoft Windows) brought graphical user interfaces (GUIs) to the mass market. A well-designed GUI with windows, buttons, text fields, and mouse control is not only visually pleasing but much easier for the typical user to interact with than having to type commands.
If you think about it, a GUI is really an abstraction. It’s a pretty front-end for an application that hides the complexity (control structures, object interaction, algorithms, data structures etc..) within. You already know enough Java to create some pretty powerful applications, but now we’ll learn how to beautify our applications by developing GUIs in Java using a framework called Swing.
AWT and Swing
Early versions of Java included a collection of GUI classes called the Abstract Window Toolkit (AWT). A major flaw of the AWT was that GUI components (also called widgets, or window gadgets), such as buttons, would look different depending on the operating system the application was running on. The result was that an application might look perfect on one system but terrible on another. Obviously, this system-dependent look-and-feel conflicted with Java’s “write-once run-anywhere” philosophy.
To address the weaknesses of the AWT, Java 1.2 added a new framework called Swing. Rather than reinvent the wheel, most Swing classes inherit from AWT classes to reuse what worked, override weaknesses, and add new features. Java applications that use Swing have exactly the same look-and-feel on all platforms that Java runs on. By the way, Dr. Java is written using Swing!
Swing Class Hierarchy
Below are the most commonly used AWT and Swing classes, and the ones that we will learn to use. Entire books are written on Swing, and there are many more classes than I’ve shown below. My focus here will be to teach you enough Swing to create simple GUIs and provide you with a strong foundation for further study.
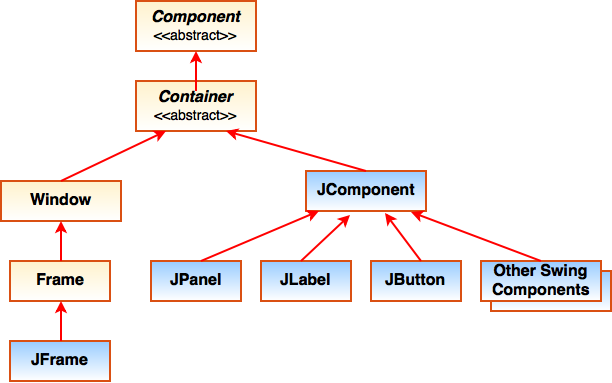 Let’s examine this diagram from the bottom to the top. As mentioned, Swing builds on the older AWT framework. Most Swing classes begin with the letter J (for Java) to distinguish them from AWT classes with the same name. For example, the Frame class is from AWT while JFrame is from Swing. In general, you should avoid using AWT classes directly. For example, you should not put a JButton widget inside a Frame; use a JFrame instead.
Most Swing widgets inherit from JComponent. Through polymorphism, any method that accepts a JComponent object reference as a parameter will accept most Swing widgets. The obvious exception shown is the JFrame widget. A JFrame is referred to as a top-level widget because it indirectly inherits from the Window class and contains other widgets. Finally, a Container is-a type of Component that can hold other components.
If you have a look at the JFrame class in the Java API you’ll note that it defines a few dozen methods — but these are not all that a JFrame has! Since JFrame is a direct subclass of Frame, it inherits a few dozen Frame methods. But that’s not all! Since JFrame is an indirect subclass of Window, and Container, and Component (and of course Object) it also inherits several hundred other methods from these classes. In a similar way, the other Swing classes also benefit from the power of inheritance.
Below is a brief description of the most commonly used AWT and Swing classes:
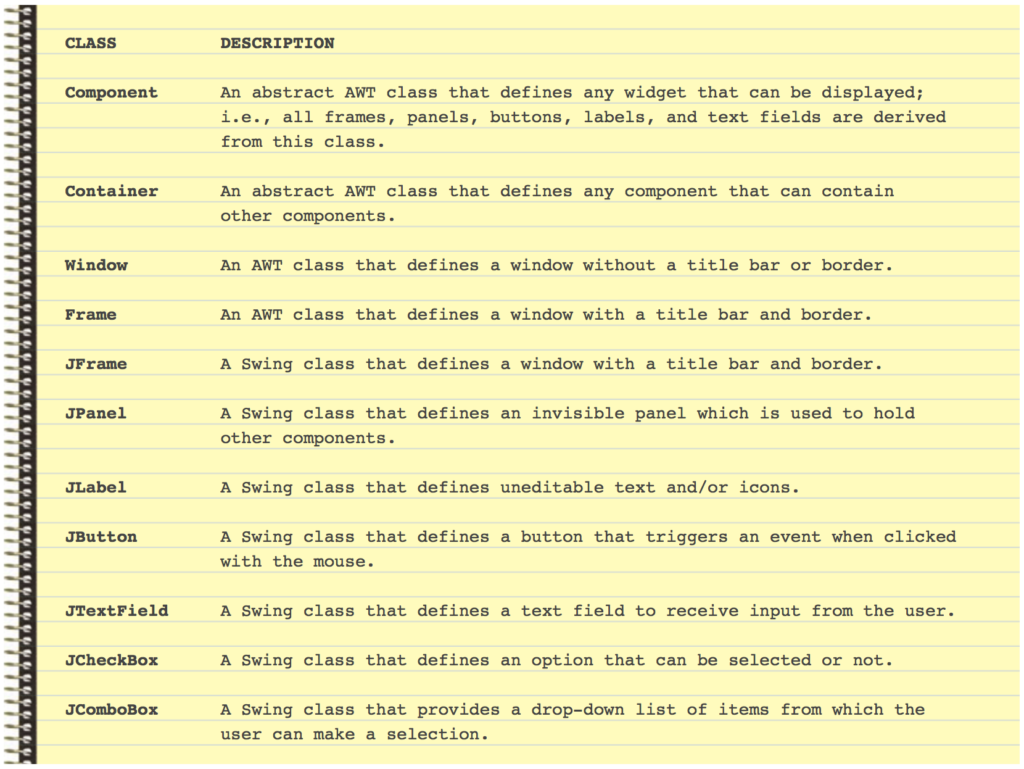 All AWT classes are stored in the java.awt package, and all Swing classes are stored in the javax.swing package. Don’t forget to import them as needed!
Creating a Window (JFrame)
A JFrame typically defines the main window of an application. Let’s create an empty window:
|
1 2 3 4 5 6 7 8 9 10 11 12 |
import javax.swing.JFrame; public class FirstWindow { public static void main( String[] args ) { JFrame appWindow = new JFrame( "Wonderful Window!" ); // appWindow.setTitle("New Title Text!"); appWindow.setSize( 320, 240 ); appWindow.setDefaultCloseOperation( JFrame.EXIT_ON_CLOSE ); appWindow.setVisible( true ); } } |
On line 1 we remember to import the JFrame class from the javax.swing package. On line 5 we instantiate a JFrame for our application window and set its title bar text – there is also a setTitle() method that can be used to change the title bar anytime after the window is created.
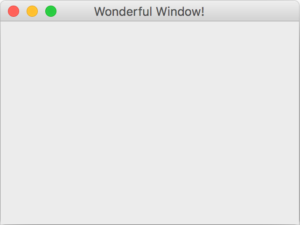 The setSize() method sets the outer dimensions of the window in pixels. To terminate the application when the user closes the window you should use setDefaultCloseOperation() with the JFrame.EXIT_ON_CLOSE constant. If you don’t do this your application will continue running in the background after the window disappears.
Finally, to make the window actually appear on the screen we call the setVisible() method and pass it a true value. You should always call setVisible() last, otherwise you might see some display flickering.
Creating a Drawing Panel (JPanel)
Now that we have our JFrame (window), let’s add a JPanel to it that can be drawn on or used to group other components such as buttons. Rather than clutter our main() method, we’ll create a separate class to implement a custom JPanel and call it MyPanel:
|
1 2 3 4 5 6 7 8 9 10 11 12 13 14 15 16 17 18 19 |
import java.awt.Graphics; import javax.swing.JPanel; public class MyPanel extends JPanel { // This method is called automatically by the JVM when the window needs to be (re)drawn. @Override public void paintComponent( Graphics g ) { // We MUST call the overridden paintComponent() method from JPanel first super.paintComponent( g ); // Get the dimensions of the panel in pixels int panelWidth = getWidth(); int panelHeight = getHeight(); // Draw diagonal lines between opposite corners g.drawLine( 0, 0, panelWidth, panelHeight ); g.drawLine( 0, panelHeight, panelWidth, 0 ); } } |
Our MyPanel class extends the JPanel class on line 4. The JPanel class includes a special method called paintComponent() that is automatically called whenever the application window needs to be (re)drawn; for example, if it’s resized. The JVM passes in a Graphics object (commonly named g) that includes methods for drawing lines and shapes.
To be able to customize the behavior of this inherited paintComponent() method, we override it. On line 9 we must call the overridden version of paintComponent() first then follow that with our custom code. This ensures that the panel is properly rendered on the screen before we start drawing on it.
Since we are inheriting from JPanel we gain access to all of its methods. The inherited getWidth() and getHeight() methods return the dimensions of our JPanel in pixels.
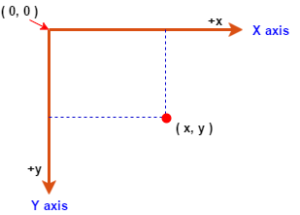 In Java, each pixel (dot on the screen) has an x (horizontal) and y (vertical) coordinate. Unlike the Cartesian coordinate system you are familiar with from math class, AWT coordinates are referenced from the upper left-corner which is at (0, 0), x increases to the right, and y increases down (not up).
The parameter Graphics object g includes a drawLine() method to draw between two given points. Lines 16 and 17 use this method to draw lines between opposite corners of our JPanel.
Once the MyPanel class is complete, we simply need to instantiate it in our main() method and then add() it to our window (JFrame) as shown on lines 7 and 8, below:
|
1 2 3 4 5 6 7 8 9 10 11 12 13 14 |
import javax.swing.JFrame; public class MyWindow { public static void main( String[] args ) { JFrame appWindow = new JFrame( "X-Window" ); MyPanel drawPanel = new MyPanel(); appWindow.add( drawPanel ); appWindow.setSize( 320, 240 ); appWindow.setDefaultCloseOperation( JFrame.EXIT_ON_CLOSE ); appWindow.setVisible( true ); } } |
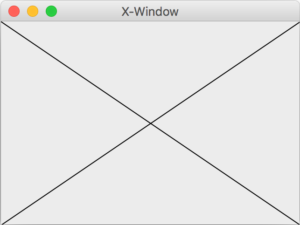 If you run this code you will see a window like this. Try resizing the window to observe how the paintComponent() method is automatically called by the JVM to continuously redraw the “X” as the window dimensions change.
Colours and Shapes
If you have a look in the Java API you will find that the Graphics class includes many useful methods to draw other shapes like rectangles, ovals, arcs, and polygons. Most of the shape drawing methods work by defining a rectangular bounding area, with top-left corner at (x, y) and a width and height, then drawing the required shape within that bounding area.
There is also a setColor() method that allows you to change the drawing colour for subsequently drawn shapes. The parameter to the setColor() method is a Color object. The Color class provides over a dozen colour constants and several overloaded constructors that you can use to create custom Color objects. The simplest to use constructor has three integer parameters corresponding to the amount of red (r), green (g), and blue (b) desired. Each of these parameters must be within the range 0 to 255, inclusive.
Here is a custom JPanel to demonstrate a few of these methods in action:
|
1 2 3 4 5 6 7 8 9 10 11 12 13 14 15 16 17 18 19 20 21 22 23 24 25 26 27 28 29 30 31 32 33 34 35 36 |
import java.awt.Color; import java.awt.Graphics; import javax.swing.JPanel; public class SmileyPanel extends JPanel { public void paintComponent( Graphics g ) { super.paintComponent( g ); Color faceColor = new Color( 229, 194, 152 ); // frame the face g.setColor( Color.BLUE ); g.drawRect( 5, 5, 210, 210 ); // draw the face as a filled oval g.setColor( faceColor ); g.fillOval( 10, 10, 200, 200 ); // layer black ovals on white ovals for the eyes g.setColor( Color.WHITE ); g.fillOval( 55, 65, 30, 25 ); g.fillOval( 135, 65, 30, 25 ); g.setColor( Color.BLACK ); g.fillOval( 60, 70, 20, 15 ); g.fillOval( 140, 70, 20, 15 ); // draw the mouth g.setColor( Color.MAGENTA ); g.fillOval( 50, 110, 120, 60 ); // "touch up" the mouth into a smile by layering shapes g.setColor( faceColor ); g.fillRect( 50, 110, 120, 30 ); g.fillOval( 50, 120, 120, 40 ); } } |
Line 9 creates a custom Color object with RGB values to approximate a skin tone that is later used on lines 16 and 32.
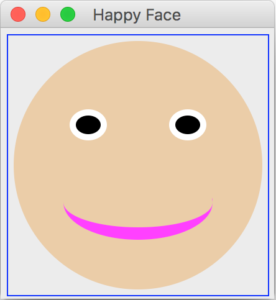 Note that once a colour is changed using setColor(), that colour remains the drawing colour until setColor() is called again. Also notice how filled shapes can be layered on top of each other to produce some interesting effects; for example, the eyes and mouth — try commenting out the last two lines to see this in action. The rest of the code should be pretty self-explanatory to you at this point in your learning.
You Try!
- Modify the “X-Window” example code such that the two lines drawn have randomly determined end points within the panel. You might consider using the Random class to simplify generating random integers within a specific range. What happens when you resize the window? Why does this happen?
- Create your own test program to display the SmileyPanel in a window. Modify the SmileyPanel code so that the face resembles you!
- Create an application that prompts the user to enter 1 for rectangles or 2 for ovals.
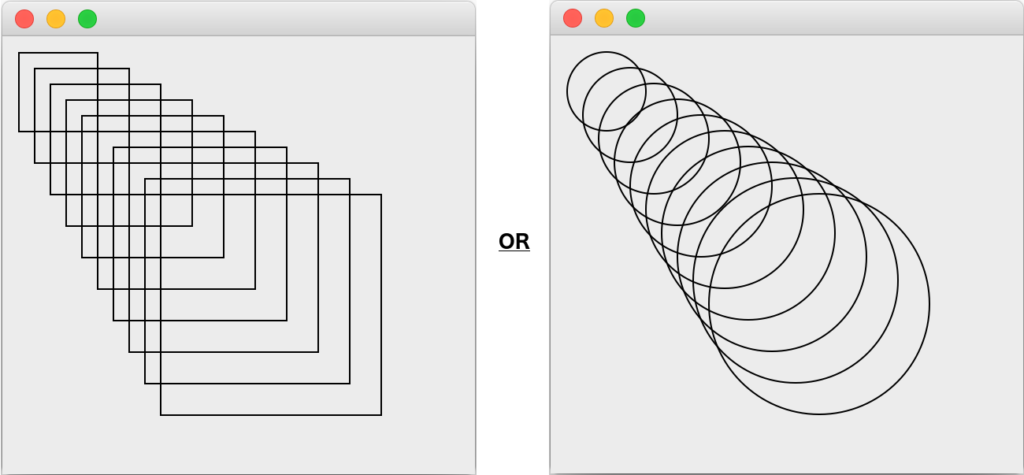
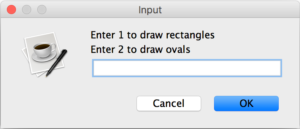 Based on their choice, display a cascading pattern of 10 shapes; like so:
Hints:- Ask for the user’s selection using a JOptionPane dialog before instantiating your custom JPanel.
- To your custom JPanel, add an instance variable to keep track of the shape type selected, and a constructor to set the instance variable. This way your paintComponent() method can produce a different image depending on the instance variable’s value.
- Create an application that prompts the user to enter 1 for a square spiral or 2 for a circular spiral.
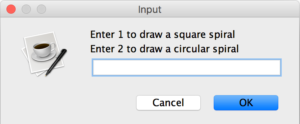
Based on their choice, display one of the following patterns: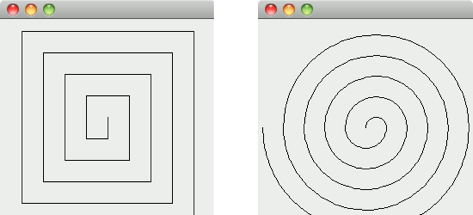 Hints:
- Do Q3 first!
- To draw the square spiral, start in the center of the panel. Use the method drawLine(), and a loop that increases the line length after drawing every second line. The direction in which to draw the next line should follow a distinct pattern, such as down, left, up, right.
- To draw the circular spiral, research the drawArc() method to draw one semi-circle at a time. Each successive semi-circle should have a larger radius (as specified by the bounding rectangle’s width) and should continue drawing where the previous semi-circle finished.
- There are many interesting patterns that you can make using straight lines. Try and create the following patterns:
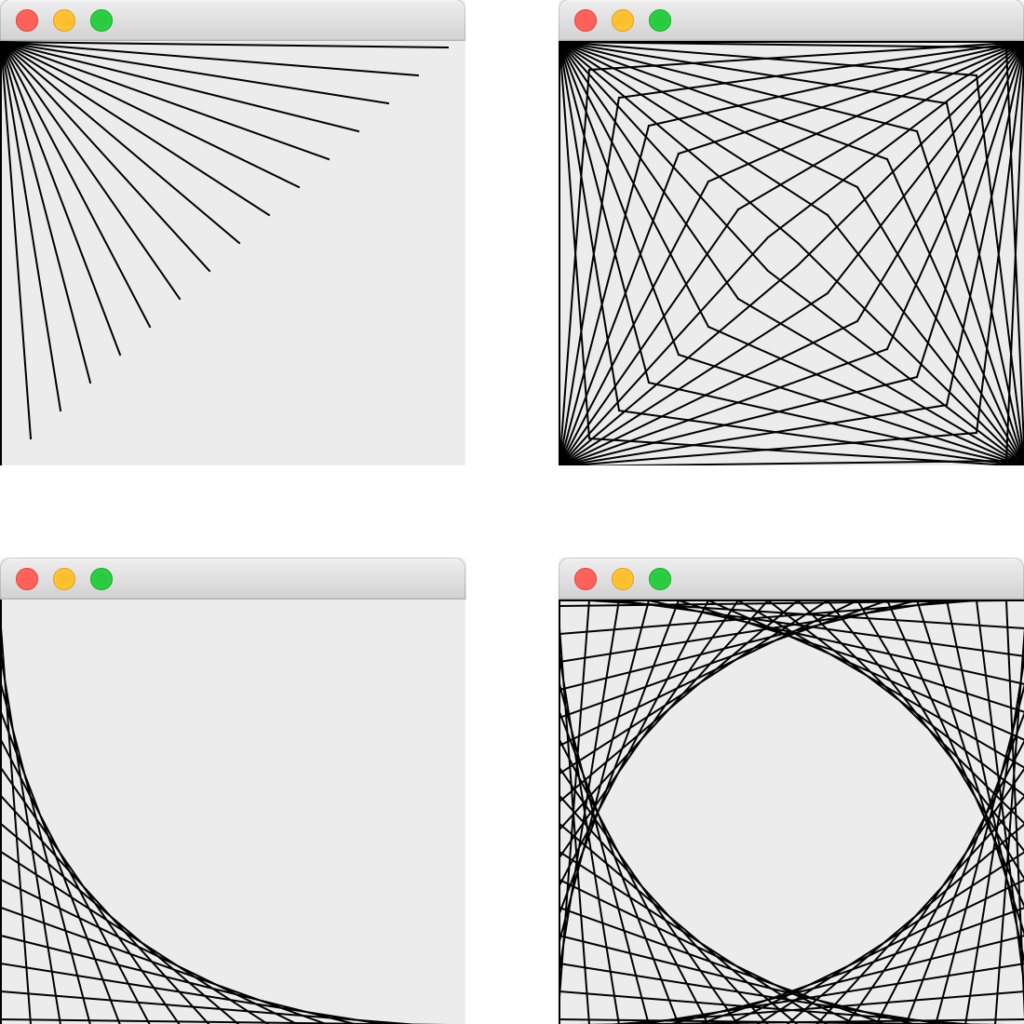 Note that the patterns should adjust themselves correctly if the window is resized.
Hints:- To draw the top-left design, draw lines starting from (0,0), fanning out until they cover the upper-left half of the panel. One approach is to divide the width and height of the panel into an equal number of steps (15 steps works well). The second end-point for each line can be found by starting at the bottom left corner and moving up one vertical step and right one horizontal step. Draw a line between the two end-points. Continue moving up and to the right one step to find each successive end-point.
- To draw the top-right design, modify the application above to have lines fan out from all four corners. The lines from opposite corners should intersect along the middle.
- To draw the bottom-left design, begin by dividing each edge into an equal number of increments (again, 15 works well). The first line starts in the top-left corner and ends one step right on the bottom edge. For each successive line, move down one increment on the left edge and right one increment on the bottom edge. Continue drawing lines until you reach the bottom-right corner.
- To draw the bottom-right design, modify the application above to mirror the design in all four corners.