We have used an array to implement static stack and queue ADTs. Arrays have both advantages and disadvantages. The advantages of arrays are that they are simple to work with and provide very efficient access to data as long as we know the index.
The primary disadvantage is that arrays have a fixed size. This means if we need to increase the size of an array a new larger one must be created, and every element must be copied from the old array into the new one – you experienced this first hand in 3-2 Q3. Similarly, if you need to insert or delete an element in the middle of an array this will also be very inefficient because you will need to shift all of the elements after the insertion point by 1 position in the array.
Today we’ll investigate a dynamic data structure called a linked list, and later we’ll use this to build dynamic stack and queue ADTs.
The Concept of a Linked List
A linked list is made up of a chain of nodes. Each node is an object that contains a data element and a reference to the next node in the chain (or null if it’s the last node).
 Interestingly, the strengths of a linked list are the weaknesses of arrays and vice versa. Linked lists are dynamic data structures so we don’t need to worry when writing our code that the size may be too small or too large (wasting memory). Inserting or deleting nodes is relatively efficient compared to working with a large array.
All of this convenience comes with some downsides. Linked lists are more complex data structures than arrays. As you’ll learn, building your own linked list data structure requires a solid understanding of object references. Furthermore, nodes are not accessed by index. Unless the data you want is at front of the linked list you may need to traverse the entire chain to find what you are looking for (i.e., linear search).
The bottom line is that linked lists are a good choice for storing data if you are often adding or removing elements, and only occasionally accessing the data, or mainly accessing the data in the first (or last) node. As we’ll see later, this makes linked lists ideal for stack and queue implementations!
The ListNode Class
Let’s start by defining a generic <T> class to represent a single node in a linked list:
|
1 2 3 4 5 6 7 8 9 10 11 12 13 14 15 16 17 18 19 20 21 22 23 24 25 26 27 28 29 30 31 32 33 34 35 |
public class ListNode<T> { private T data; private ListNode next; // Constructor: No reference to next node provided so make it null public ListNode( T nodeData ) { this( nodeData, null); } // Constructor: Set data and reference to next node. public ListNode( T nodeData, ListNode nodeNext ) { data = nodeData; next = nodeNext; } // Accessor: Return the data for current ListNode object public T getData() { return data; } // Accessor: Return reference to next ListNode object public ListNode getNext() { return next; } // Mutator: Set new data for current ListNode object public void setData( T newData ) { data = newData; } // Mutator: Set new reference to the next node object public void setNext( ListNode newNext ) { next = newNext; } } |
As you’d expect, I’ve made this a generic class (just like the ArrayList class) such that we can store any kind of object. Notice that each ListNode object will encapsulate a reference to a data object and a reference to another ListNode object that may be linked after the current one. Here’s some demo code to show how one might create and link two ListNode objects containing String data:
|
1 2 3 4 5 6 7 8 9 10 11 12 13 14 15 |
class ListNodeTest { public static void main( String[] args ) { ListNode<String> node1; ListNode<String> node2; // node2: data -> "Allen, next -> null node2 = new ListNode<String>( "Allen" ); // node1: data -> "Peggy", next -> node2 node1 = new ListNode<String>( "Peggy", node2 ); System.out.print( node1.getData() + " points to " + node1.getNext().getData() ); System.out.println( ", and " + node2.getData() + " points to " + node2.getNext() ); } } |
Peggy points to Allen, and Allen points to null.
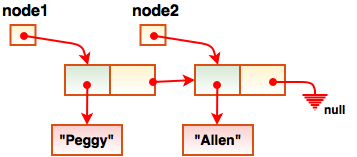
This is what happens in memory:

First we instantiate a ListNode<String> called node2 with the data “Allen” and null (by default) set as its reference to the next node since this will be the last node in our chain. Next we instantiate another ListNode<String> with the data “Peggy” and pass in a reference to node2 so that our new node1 will link to node2. By linking nodes together in this way we are creating a simple linked list.
It’s important to realize that both the data and next instance variables of the ListNode class are references to objects. In the example above, the data instance variable refers to a String object, and next refers to another ListNode object (or null).
Linked List Operations
As with any abstract data type (ADT) there are certain operations that linked lists are expected to have:
- To check if the linked list is empty (“isEmpty“).
- To delete all of the nodes in the linked list (“clear“).
- To check how many elements are in the linked list (“size“).
- To add a node to the front of the linked list (“addFirst“).
- To look at the data in the front node, but not remove it (“peekFirst“).
- To remove a node from the front of the linked list (“removeFirst“).
- To determine if the linked list contains a certain element (“contains“).
The LinkedListADT Interface
Based on the expected operations above, we can write a Java interface for a Linked List ADT:
|
1 2 3 4 5 6 7 8 9 10 11 12 13 14 15 16 17 18 19 20 21 22 23 24 25 26 27 |
public interface LinkedListADT<T> { // Returns true if the linked list has no nodes, or false otherwise. public boolean isEmpty(); // Deletes all of the nodes in the linked list. public void clear(); // Returns the number of nodes in the linked list public int size(); // Adds a node to the front of the linked list. public void addFirst( T element ); // Returns a reference to the data in the first node, or null if the list is empty. public T peekFirst(); // Removes a node from the front of the linked list (if there is one). // Returns a reference to the data in the first node, or null if the list is empty. public T removeFirst(); // Returns true if the linked list contains a certain element, or false otherwise. public boolean contains( T key ); // Return String representation of the linked list. public String toString(); } |
The LinkedList Class
Ok, now let’s define a LinkedList class that implements the interface above. We’ll do this in a step-by-step fashion. Let’s start by defining our LinkedList class and its encapsulated data:
|
1 2 3 |
class LinkedList<T> implements LinkedListADT<T> { private ListNode<T> front = null; private int numberOfNodes = 0; |
Because a LinkedList “has-a” series of ListNode objects associated with it, we encapsulate a ListNode reference variable called front to point to the first ListNode in the list (or null if the list is empty). We also define a numberOfNodes variable to internally keep track of the number of nodes in our list. There is no constructor required since front is set to null and numberOfNodes to 0 when they are defined, and when instantiating LinkedList there are no parameters (e.g., the size) that need to be passed in.
Method: isEmpty()
By definition, a linked list is empty when it has no nodes. In other words, when front is null.
|
1 2 3 4 5 |
// Returns true if the linked list has no nodes, or false otherwise. @Override public boolean isEmpty() { return (front == null); } |
Method: clear()
If a linked list contains a chain of nodes, then front will refer to the first node in the chain. If we simply set front to null any ListNode objects will be unlinked and automatically garbage collected by the JVM – elegant!
|
1 2 3 4 5 6 7 |
// Deletes all of the nodes in the linked list. // Note: ListNode objects will be automatically garbage collected by JVM. @Override public void clear() { front = null; numberOfNodes = 0; } |
Method: size()
The numberOfNodes variable will be used to keep track of the number of nodes in the LinkedList. This method acts like an accessor method, but I’ve chosen not to call it getNumberOfNodes() because size() is the traditional name for this method when dealing with linked lists.
|
1 2 3 4 5 |
// Returns the number of nodes in the linked list @Override public int size() { return numberOfNodes; } |
Method: addFirst()
Adding an element to the front of the list is very easy. First, we create the new ListNode object containing the element data, and set its next reference to whatever front is currently pointing to. Front may be referring to null if the list is empty, or the current first ListNode in the list. Second, we make front refer to the new ListNode object we’ve just created and add 1 to the numberOfNodes counter.

|
1 2 3 4 5 6 |
// Adds a node to the front of the linked list. @Override public void addFirst( T element ) { front = new ListNode<T>( element, front ); numberOfNodes++; } |
Method: peekFirst()
To return a reference to the data in the first node, we must first check that there actually is a first node. Otherwise, if we try to call the getData() method on a null reference we will get a NullPointerException.
|
1 2 3 4 5 6 7 8 |
// Returns a reference to the data in the first node, or null if the list is empty. @Override public T peekFirst() { if ( isEmpty() ) return null; return front.getData(); } |
Method: removeFirst()
Removing the first ListNode is almost as easy. Usually when a node is removed from a LinkedList the caller would like to know what the data in that node was – kind of like a stack pop(). To avoid a run-time error, we again start by ensuring that the list is not empty. If it is empty, we simply return null since there is no first ListNode (or data attribute) to be removed.
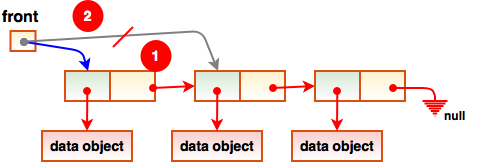
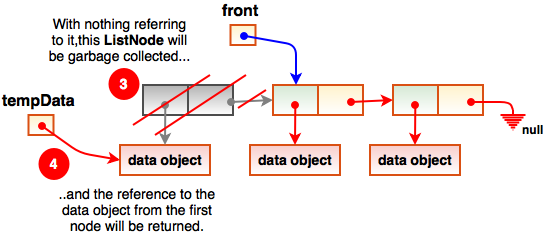
Assuming that the list has at least one ListNode, we first make a temporary reference (tempData) to the node’s data object (so that we can return it), then set our front reference to the second ListNode in the chain, and finally reduce the numberOfNodes counter.

|
1 2 3 4 5 6 7 8 9 10 11 12 13 14 15 |
// Removes a node from the front of the linked list (if there is one). // Returns a reference to the data in the first node, or null if the list is empty. @Override @SuppressWarnings("unchecked") public T removeFirst() { T tempData; if ( isEmpty() ) return null; tempData = front.getData(); front = front.getNext(); numberOfNodes--; return tempData; } |
Note that once there are no reference variables referring to the first node in the linked list, it will automatically be garbage collected by the JVM. However, the data object that was associated with the first node is not garbage collected because tempData refers to it, keeping it active in memory. It is the tempData reference that gets returned to the calling code.

Method: contains()
To check if a LinkedList contains a specific data element we must traverse (i.e., visit every ListNode) and compare its data with the search key that we are looking for – essentially a linear search. If the search key is found, we return true , otherwise false. Here’s the code:
|
1 2 3 4 5 6 7 8 9 10 11 |
// Returns true if the linked list contains a certain element, or false otherwise. @Override @SuppressWarnings("unchecked") public boolean contains( T key ) { ListNode<T> searchNode; searchNode = front; while ( ( searchNode != null ) && ( !key.equals( searchNode.getData() ) ) ) { searchNode = searchNode.getNext(); } return ( searchNode != null ); } |
Method: toString()
To aid with debugging, here is a toString() method to return a String representation of our LinkedList. We are basically traversing the list like in the contains() method, except we aren’t looking for a particular search key.
|
1 2 3 4 5 6 7 8 9 10 11 12 13 14 15 16 |
// Return String representation of the linked list. @Override @SuppressWarnings("unchecked") public String toString() { ListNode<T> node; String linkedList = "FRONT ==> "; node = front; while (node != null) { linkedList += "[ " + node.getData() + " ] ==> "; node = node.getNext(); } return linkedList + "NULL"; } } |
Testing the LinkedList
Finally, let’s create a test class to demonstrate how our LinkedList works:
|
1 2 3 4 5 6 7 8 9 10 11 12 13 14 15 16 17 18 19 20 21 22 23 24 25 26 27 28 29 30 31 32 33 34 35 36 37 38 39 |
import java.util.Scanner; class LinkedListTest { public static void main( String[] args ) { String command; Scanner keyInput = new Scanner(System.in); LinkedList<String> myList = new LinkedList<>(); while (true) { System.out.printf( "\nList Empty? %b List Size? %d %s\n", myList.isEmpty(), myList.size(), myList ); System.out.print("Command >"); command = keyInput.nextLine().toLowerCase().trim(); if (command.startsWith("add")) { myList.addFirst(command.substring(4)); System.out.println( "Added to front: " + myList.peekFirst() ); } else if (command.startsWith("peek")) { System.out.println( "Peeked at front: " + myList.peekFirst() ); } else if (command.startsWith("rem")) { System.out.println( "Removed from front: " + myList.removeFirst() ); } else if (command.startsWith("con")) { System.out.println( "Contains \"" + command.substring(4) +"\"? " + myList.contains(command.substring(4)) ); } else if (command.startsWith("clear")) { myList.clear(); System.out.println( "Cleared!" ); } else if (command.startsWith("quit")) { System.out.println( "Bye-Bye!"); break; } else { System.out.println( "I don't understand \""+command+"\". Please use: add X, peek, rem, con X, clear, or quit" ); } } } } |
You Try!
- A linked list is a very versatile data structure. If you think about it, our LinkedList class provides all of the methods required to simulate a dynamic stack, they just have different names! For example, the addFirst() linked list method is equivalent to the push() stack method. Similarly, our LinkedList class also includes all of the methods needed to simulate a dynamic queue, except one! Enhance the LinkedList class by completing an addLast() method:
12345// Add an element to the end of the linked list@SuppressWarnings("unchecked")public void addLast( T element ) {// Add your code here...}
Hint: If the LinkedList is empty, then you can simply call addFirst() as usual. If it is not empty, you will need to traverse the linked list until you reach the last node, then link a new ListNode to the end of the list. Once you have this working, enhance the test program by adding an “append” command to demonstrate your addLast() method. - Enhance the LinkedList class again by adding a removeLast() method. The method should remove the last node from the linked list and return a reference to the data in the removed node. Modify the test program by adding a “del” command to demonstrate our removeLast() method. Hint: here you will have 3 situations to deal with: (1) if the list is empty, (2) if the list only has 1 node, or (3) if there is more than one node and you need to traverse the list.