We’ve come a long way in our Python learning journey! It’s time to apply all that we have learned to create 2D video games!
As I’ve said before, game development requires the basic control structures, data structures, and understanding of Object-Oriented Programming techniques that we have been studying. However, games also involve more thought about graphics, sound, user input, and timing than traditional text-based programs. All of this may seem daunting at first, but I’ll show you how pygame takes care of a lot of these details for us. Most importantly, I’ll teach you a general code design pattern that you can use for all of your games, from simple to complex.
 To help us develop games, we’re going to use a special module called pygame. Pygame v2.0.1 is automatically included with Mu, so you do not need to install pygame separately.
Pygame is a free game development library created by a great guy named Pete Shinners. Thanks, Pete! The official pygame Web site is www.pygame.org and there you’ll find even more resources and hundreds of sample games written using pygame.
Creating a Sense of Time
Games need to process hundreds of calculations in a fraction of a second and be able to repeat this process indefinitely. The speed at which a game repeats is called the frame rate. If you have a high frame rate, the repeated screen updates look like fluid motion. Television has a frame rate of about 30 frames per second (fps). If your game has a frame rate of fewer than 10 fps it will appear choppy.
The more things going on in your game, the more work the computer has to do during each tiny time slice. If you have hundreds of aliens running around the screen and you need to check each for collisions, it’s possible that the computer won’t be able to do all the necessary calculations in the allotted time and your game will visibly slow down (or “lag”).
The key is to set a frame rate that is fast enough to give the illusion of motion yet slow enough that your computer will be able to keep up. You also want to specify a consistent frame rate so your game doesn’t appear to change speed depending on what’s happening on-screen.
Creating a Sense of Space
 Games are also interesting because of the way they manage the notion of space. If you look really closely at an old CRT monitor (it’s too hard to see on an LCD), you’ll see that the screen image is actually made up of millions of coloured dots of light. Each of these dots is called a pixel (picture element). If you look even closer you’ll see that each pixel is made up of three even smaller dots that control the amount of Red, Green, and Blue in the pixel. This is where the acronym RGB comes from. In addition to colour, each pixel has an (x, y) coordinate. The number of pixels used determines the screen resolution of the game – typically: 640×480 or 800×600.
Creating a Gaming Loop
The basic structure of most games is the same, regardless of the type of game or even programming language. This design pattern is sometimes called the animation loop or gaming loop. I’ll spend a lot more time explaining the details of this in future lessons, but the basic steps include:
-
- Creating or loading most of the resources (i.e., game objects, artwork, and music) for the game so that this does not slow down the gaming loop.
- Creating an (almost) infinite loop that will repeat until the game is over or the user decides to close the game window. Within this loop we need to:
- Control the frame rate so that the game runs smoothly.
- Get (keyboard, mouse, or joystick) input from the user.
- Update the positions of each game object as needed.
- Refresh the screen.
Any game you have ever played follows the same basic steps outlined above!
The IDEA/ALTER Framework
Now let’s get to some code! Below is some “skeleton” code to implement the basic gaming loop algorithm described above. You will use this code as the starting point for all of your games so it’s important to understand how it works.
|
1 2 3 4 5 6 7 8 9 10 11 12 13 14 15 16 17 18 19 20 21 22 23 24 25 26 27 28 29 30 31 32 33 34 35 36 |
# I - Import and Initialize import pygame pygame.init() # D - Display configuration screen = pygame.display.set_mode((640, 480)) pygame.display.set_caption("Hello, world!") # E - Entities (just background for now) background = pygame.Surface(screen.get_size()) background = background.convert() background.fill((0, 0, 255)) # A - Action (broken into ALTER steps) # A - Assign values to key variables clock = pygame.time.Clock() keepGoing = True # L - Loop while keepGoing: # T - Timer to set frame rate clock.tick(30) # E - Event handling for event in pygame.event.get(): if event.type == pygame.QUIT: keepGoing = False # R - Refresh display screen.blit(background, (0, 0)) pygame.display.flip() # Close the game window pygame.quit() |
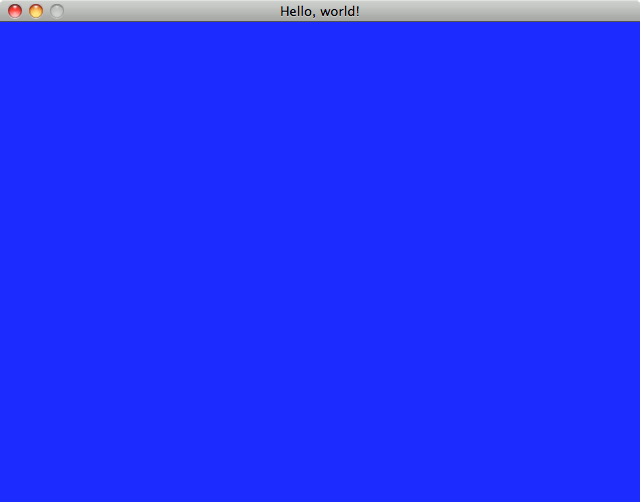
 If you run this program you will find that it displays a blue screen — *dabs* yeet!
There’s a lot of detail crammed into this short program, but once you understand the basic structure, you’ll use some variation of it in every game you write. Looking at the code comments, you’ll notice that I have broken the code down into steps, each with its own letter. The letters form an easy to remember acronym: IDEA/ALTER.
The IDEA part of the IDEA/ALTER framework is all about initialization, that is, setting up the environment before the main gaming loop starts. There are four steps:
I – Import and initialize
On line 2 we start by importing the pygame library so that we have access to all of its objects and functions in our game. Calling the pygame.init() method on line 3 activates several subsystems to help check the mouse and keyboard, play sounds, and set up the visual display. Without this, your game cannot run!
D – Display
Again, there are only two lines of code here but they do a lot of work. Line 6 initializes the game window to the desired resolution. You’ll notice that I’m passing the parameters 640 and 480 into the set_mode() method using a tuple. 640×480 may seem too low-resolution for a game, but it’s actually a good choice for two reasons: (1) your games will run a lot quicker because there are fewer pixels to manipulate, and (2) this leaves room on your screen to view your code for debugging purposes. Line 7sets the title bar text for the window.
E – Entities
Video games are all about things (game developers call entities) moving around on the screen and crashing into each other. The background (even a plain blue one) is also an entity. A surface is a place in memory that represents a 2D image. Line 10instantiates a Surface object to represent the background image for our game.
Images come in all sorts of formats. Pygame can convert many formats into a version it can read easily, but image conversion takes time. For this reason, it’s important to do this sort of image processing before the game loop starts so that it can run as efficiently as possible. The convert() method does not change the original Surface object (because it is immutable), instead, it creates and returns a new surface. To modify the original surface, we need to copy the converted surface back to the original.
On line 12, we call the fill() method to specify that we want to fill our background surface with the colour blue. Three integers in the range 0 to 255 are passed into this method using a tuple. The numbers represent the quantity of red, green, and blue (RGB) that we desire. In this case, (0, 0, 255) indicates that we want 0 red, 0 green, and 255 blue.
A – Action
The action part of the IDEA framework is the main gaming loop. The game loop controls the action in the game: manages time, checks for user interactions, moves entities around, and updates the visual display. You can remember these details with another acronym: ALTER (because the game loop is about “altering” the screen).
A – Assign Values
On line 17 we instantiate a Clock object which we will later use to control the frame rate of our game. Line18 initializes a variable used to terminate our gaming loop when the game ends, or the user decides to close the window.
L – Loop
Begin the actual gaming loop. As long as the keepGoing variable is True, the game loop will continue.
T – Time
Outside the game loop, we created a Clock object. By calling its tick() method we can easily set the maximum frame rate that we would like for our game. In this case 30 fps.
E – Events
Games use all kinds of devices to allow user interaction such as the keyboard, mouse, and joystick. Thankfully, pygame simplifies the process of handling events for us. Every time an event occurs in our game, pygame creates a special object to record the event and appends it to a list of events that have occurred called an event queue. The pygame.event.get() method returns a list of events that have occurred since the previous frame of the game.
Using a for loop we can iterate over this list. Each object in the event list has a special type attribute that tells you what type of event it is. Using an if statement we can handle different kinds of events. At this point, we’re only looking for the pygame.QUITevent that happens when the user closes the game window. In this case, I set the keepGoing variable to False which will cause our main game loop to terminate. Other events might cause us to change the coordinates of an entity on the screen.
R – Refresh Screen
The final step of the game loop is the most dramatic: updating the visual display so the user sees the results of all our hard work! This involves a two-step process: blitting and display flipping.
The term blit stands for block transfer. Recall in our Display (IDEA) step that we created a variable called screen to refer to our game window. To actually display Surface objects on our screen we need to copy them bit by bit. Fortunately, pygame has a very efficient function called blit() that does exactly that. Line 32 “blits” our blue background surface onto our screen object. The (0, 0) parameter specifies where on our screen to place the copied bits.
It’s important to understand that the blitting described above is only copying bits in memory, it does not actually output anything to the monitor. Depending on the number of surfaces that you need to blit, your game could have a noticeable flicker if we tried to display the surfaces while they are being copied (i.e., blitted).
Instead, once all of the surfaces have been blitted in memory, then we actually show the final result to the user. This process is called display flipping. The pygame.display.flip() function call on line 33 takes the finished screen and copies it to the actual video display card hardware, causing our game window to visually update.
After the Refresh (ALTER) section, and outside the main game loop, the very last statement pygame.quit() will cause the game window to close. It’s important to make sure this line is not part of the main game loop — it should only run after keepGoing has been set to False causing the main game loop to terminate.
Creating a Simple Animation
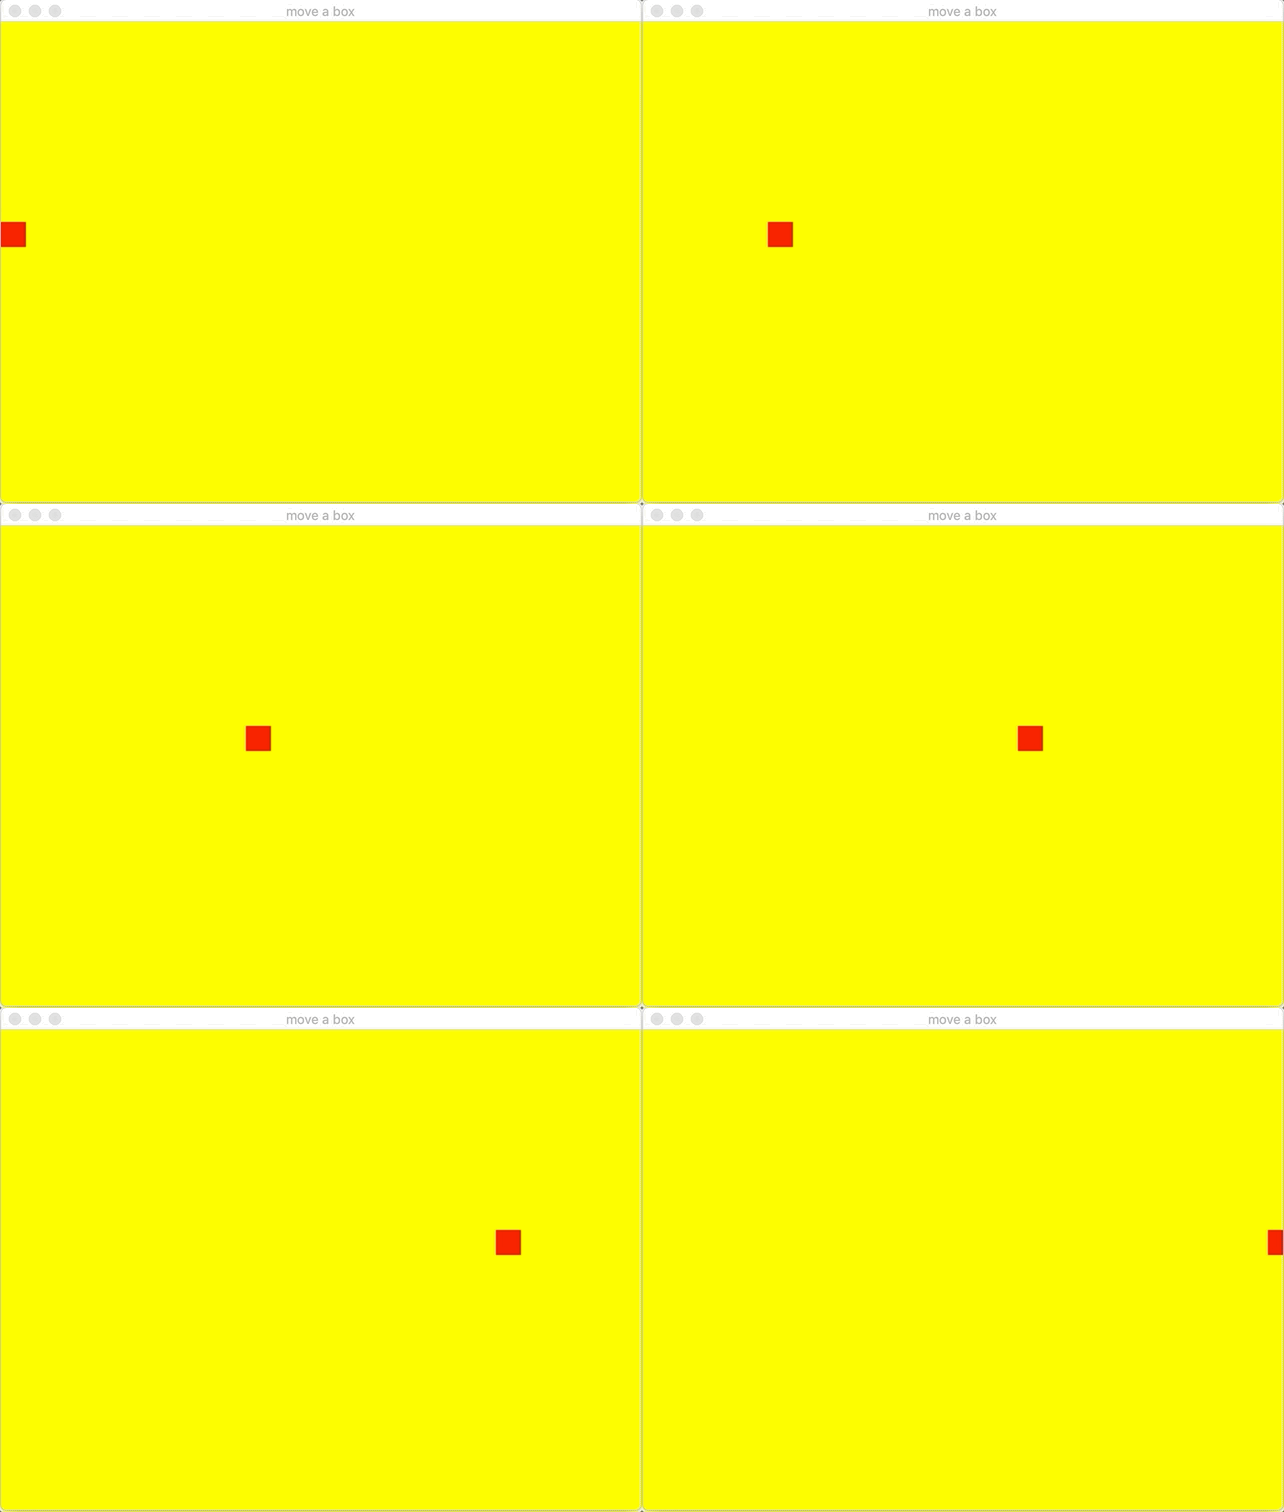
 Now that you understand the basic IDEA/ALTER framework, let’s create a simple animation! Starting with the IDEA/ALTER skeleton code, we’ll make a few changes to make a small red square move across the game window.
First, we need to create an object to place on the screen. To do this, we’ll create a red 25×25 pixel square Surface object called box. Because our box is an entity in our animation, we’ll define it within the Entity (IDEA) section of our framework (lines 15 to 17), before we get to the animation loop.
|
1 2 3 4 5 6 7 8 9 10 11 12 13 14 15 16 17 18 19 20 21 22 23 24 25 26 27 28 29 30 31 32 33 34 35 36 37 38 39 40 41 42 43 44 45 46 47 48 49 50 51 |
# Initialize import pygame pygame.init() # Display screen = pygame.display.set_mode((640, 480)) pygame.display.set_caption("move a box") # Entities background = pygame.Surface(screen.get_size()) background = background.convert() background.fill((255, 255, 0)) # yellow background # make a red 25 x 25 box box = pygame.Surface((25, 25)) box = box.convert() box.fill((255, 0, 0)) # upper-left coordinates for box box_x = 0 box_y = 200 # ACTION # Assign clock = pygame.time.Clock() keepGoing = True # Loop while keepGoing: # Time clock.tick(30) # Events for event in pygame.event.get(): if event.type == pygame.QUIT: keepGoing = False #modify box value box_x += 5 #check boundaries if box_x > screen.get_width(): box_x = 0 # Refresh screen screen.blit(background, (0, 0)) screen.blit(box, (box_x, box_y)) pygame.display.flip() # Close the game win |
 Surface objects in pygame don’t have any sense of position. You control where it appears by blitting it onto another surface. To keep track of the coordinate of the upper-left corner of our box, I’ve initialized two variables on lines 20 and 21: box_x and box_y.
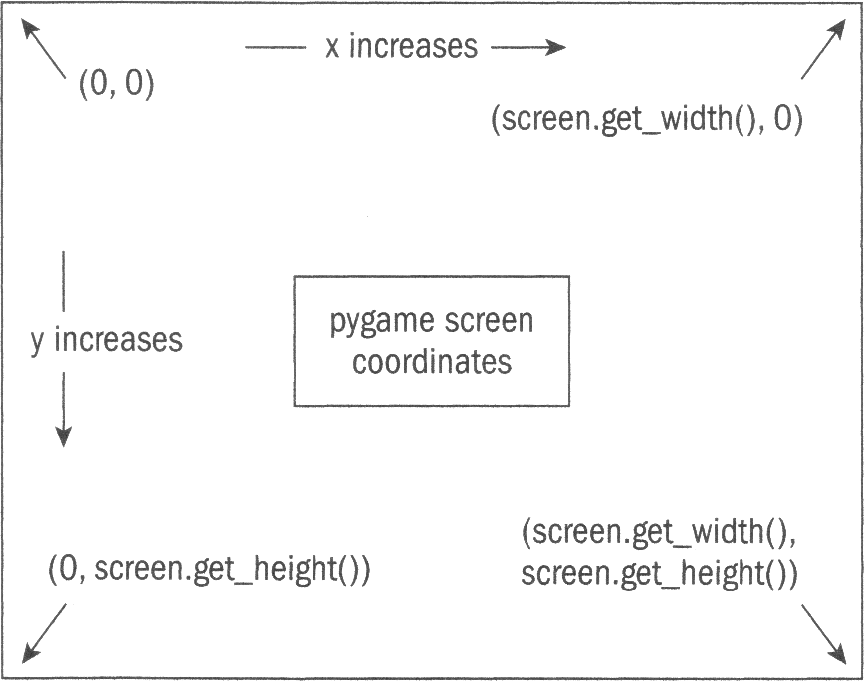
Before we go any further I better explain how pygame screen coordinates work. In math, the origin (0, 0) is either in the lower-left or centre. In computer graphics, the origin is always located in the upper-left corner. X increases as you go from left to right (as you would expect), but y increases downward! These two differences take some getting used to. The reason that computer graphics differ from math is because of the way graphics cards work, it’s more efficient to have the zero value for y at the top of the screen, and larger values as you move down the screen.
The movement of the red box happens inside the game loop, just after the Events (ALTER) section of our code (lines 40 to 44). After checking for the pygame.QUIT event, in case the user wants to terminate the animation, we modify box_x by adding 5 to it. If the x coordinate is beyond the right edge (given by the screen.get_width()method call) of the game window, then we reset it to 0 so that the box appears again at the left edge of the game window. We could also mess with box_y to change the vertical position of our box, but I’ll leave this as an exercise for you!.
At this point, our animation has two surfaces: the background and our red box. Before flipping the display, we need to blit these two entities to the screen as shown on lines 47 and 48.
An important point to note here is that the order that we blit entities matters! Since I blit the box second, it will appear on top of the background. If I had blit the background last it would cover our red box. Notice the use of box_x and box_y to specify where on the screen the upper-left corner of our box should appear.
We’ve covered a lot today, but you’re well on your way to making any kind of 2D game you can imagine. The IDEA/ALTERframework is the foundation of every game we will create so get comfortable with it. Try the example programs above, but don’t just cut and paste, type them out and think about what each line is doing! See how much you can do from memory. The more you can do on your own the better off you’ll be when it comes to developing your own games.
You Try!
- Start a new page in your Learning Journal titled “4-4 Getting Started with pygame”. Carefully read the notes above and in your own words summarize the key ideas from each section.
- What does each of the letters of the IDEA acronym stand for?
- What does each of the letters of the ALTER acronym stand for?