In this lesson, we’ll design a class to represent coin objects, including methods to simulate tossing a coin.
As described earlier, a class is like a blueprint where we describe the data (called instance variables) and related functions (called methods) that will manipulate the data within the object. The idea of combining data and related functions into the same class is called encapsulation in OOP terminology. This is one of three important aspects of OOP. We’ll get to the other two next time — stay tuned!
For our Coin class, the only piece of data we need to keep track of is what side is currently facing up; we will call this instance variable: sideup. In terms of methods, we will need some way to initialize the starting value for this instance variable, a method to “toss” a coin object to randomize which side is facing up, and a few other helpful methods that I’ll explain a little later.
Defining a Coin Class
To start, let’s create a module called myModule.py to store the following Coin class code:
|
1 2 3 4 5 6 7 8 9 10 11 12 13 14 15 16 17 18 19 20 21 22 23 24 25 26 27 28 29 30 31 32 33 34 35 36 37 38 |
import random class Coin: '''This class simulates a coin that can be flipped.''' def __init__(self, headsOrTails): '''This method defines the sideup instance variable.''' self.sideup = headsOrTails def toss(self): '''This method generates a random number in the range of 0 through 1. If the number is 0, then sideup is set to 'Heads'. Otherwise, sideup is set to 'Tails'.''' if random.randint(0, 1) == 0: self.sideup = 'Heads' else: self.sideup = 'Tails' def getSideup(self): '''This method returns the value of the sideup instance variable.''' return self.sideup def setSideup(self, headsOrTails): '''This method allows the value of the sideup instance variable to be modified, safely.''' if headsOrTails.lower() == "heads": self.sideup = "Heads" else: self.sideup = "Tails" def __str__(self): '''This method returns a string representation of a Coin object.''' return "I am a Coin with " + self.sideup + " facing up." |
On line 1 we import the random module because we will use the randint() function to help us “toss” a coin object.
Line 3 defines our Coin class name, followed by a docstring explaining its purpose.
Style Rule #11: Defining a ClassIn terms of style, class names always start with a capital letter. If there is more than one word in the name, camelCase is used for the rest. Class names are usually nouns since they describe an object. As with defining a function, each class should also have a docstring at the top explaining its purpose. |
Lines 6 through 9 define a special method called __init__() — this is called an initializer method. Note that there are 2underscore __ characters before and after the name. When a Coin object is instantiated, the initializer method is called automatically by the Python interpreter to assign starting values to any instance variables within the object. In this case, the sideup instance variable is initialized using the parameter headsOrTails. You’ll notice the use of the keyword self as the first parameter of each method, and also before the use of the sideup instance variable. The self parameter variable must appear as shown — more on this later.
Next, lines 11 through 19 define a toss() method that can be called to randomly change the sideup instance variable to either “Heads” or “Tails”.
When data is encapsulated within an object, it is very common to write special methods to allow certain instance variables to be read and/or changed easily from outside the object. Lines 21 to 24 show a special method called an accessor method. An accessor method simply returns the value of a particular instance variable.
Related to accessor methods, instance variables often have a matching mutator method as well. A mutator method accepts 1 parameter (in addition to self) that is used to change the value of a specific instance variable. Mutator methods should be designed to ensure that an instance variable is only set to some reasonable value. This is called “sanity checking” (related to GIGO). In this example, our setSideup() method will only set sideup to “Heads” or “Tails”, nothing else is possible.
Style Rule #12: Accessor and Mutator Method NamingAccessor methods should always start with get followed by the name of the instance variable it returns, using camelCase. In this case, our accessor method is called getSideup(). Similarly, mutator methods should always start with set followed by the name of the instance variable that the method changes. Here our mutator method is called setSideUp(). |
Finally, it is often helpful to be able to print information about an object. The special method __str__() (called a string method) must only include the self parameter, and must always return a string containing information about the current object. It is considered very poor design to print() in this method!
Whew! That’s a lot of details for such a short amount of code. We’ll next look at some code to demonstrate how to use this class.
Instantiating One Coin Object
Here’s code (with proper mainline logic) to instantiate (i.e., “create”) one Coin object and demonstrate the methods described above.
|
1 2 3 4 5 6 7 8 9 10 11 12 13 14 15 16 17 18 19 20 21 22 23 24 25 26 27 28 29 30 31 32 |
import myModule def main(): # Instantiate an object from the Coin class with Heads up. myCoin = myModule.Coin("Heads") # Display the side of the coin that is facing up. print('After __init__(), this side is up:', myCoin.getSideup()) # Toss the coin. print('I am tossing the coin...') myCoin.toss() # Display the side of the coin that is facing up. print('After toss(), this side is up:', myCoin.getSideup()) # Manually change to Tails up. myCoin.setSideup("Tails") # Display the side of the coin that is facing up. print('After setSideup() to "Tails", this side is up:', myCoin.getSideup()) print() # Toss the coin 10 times. print('I am going to toss the coin ten times:') for count in range(10): myCoin.toss() # Demonstration of __str__() method: print( myCoin ) # Call the main function. main() |
Line 1 starts by importing the module containing our Coin class, called myModule.py.
Line 5 shows how to instantiate a Coin object. Notice the use of dot notation to access the Coin class in the myModule module. Python automatically calls the __init__() method when a Coin object is created, and here the “Heads” argument is passed to the __init__() method as its second parameter; the first parameter (self) is given automatically by the Python interpreter, we don’t need to worry about it. Once the object is created and its instance variable(s) are initialized, the variable myCoin will refer to the Coin object in memory. We can then use the myCoin variable to access the other methods in the object.
Lines 8, 15, and 21 demonstrate the getSideup() accessor method that simply returns the current value of the sideup instance variable inside our myCoin object. Again dot notation is used, but this time with the name of our myCoin variable that refers to our Coin object in memory, rather than the module name.
Line 12 shows how to call the toss() method to randomly change the sideup instance variable inside our myCoin object.
Line 18 manually changes the sideup instance variable to “Tails” from whatever its current value is by using the setSideup()mutator method.
And finally, line 29 demonstrates what happens when you try to print() the myCoin object. In this situation, the Python interpreter automatically calls the special __str__() method that returns a user-friendly string describing the myCoin object. You should never directly call the __str__() method in your code. If we had not written a __str__() method in our Coin class, then a cryptic memory address of the myCoin object would be displayed instead.
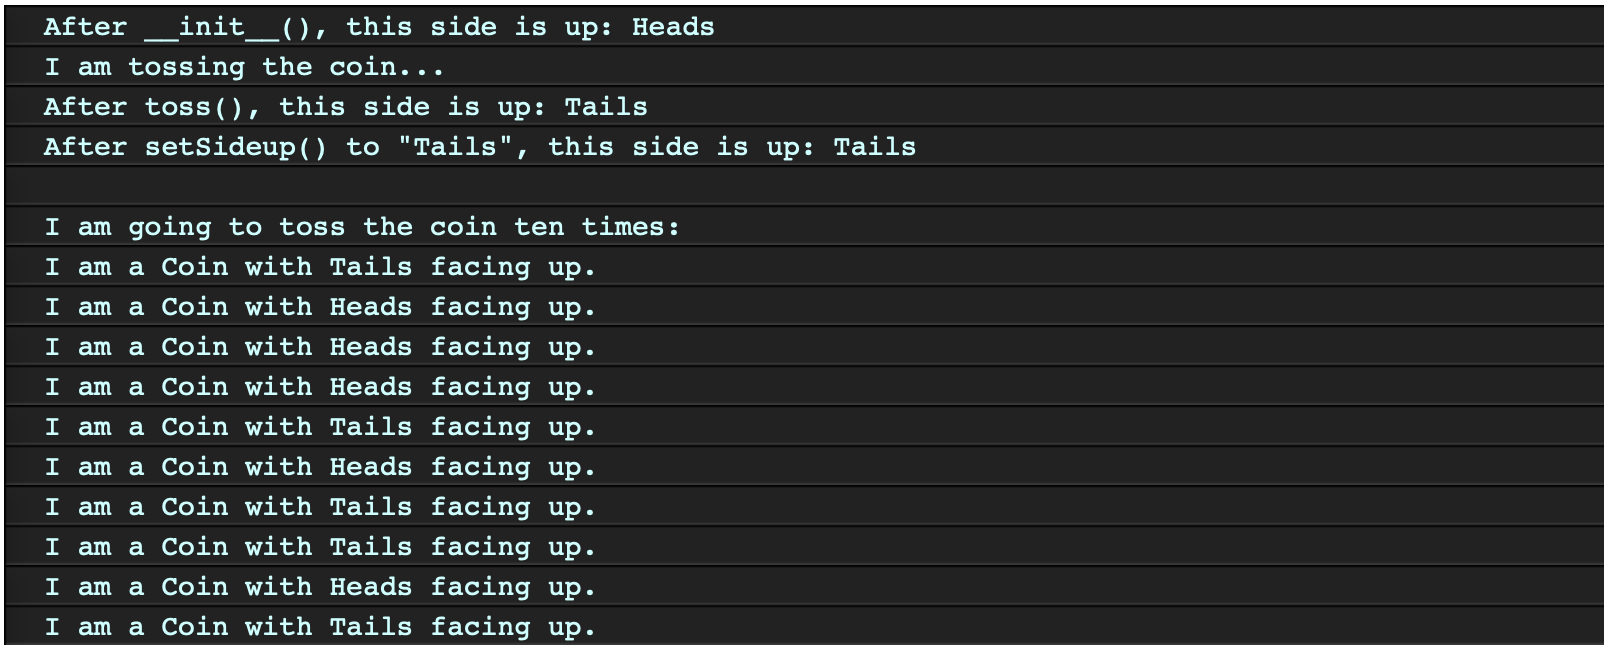
Here’s a sample run:
Try removing the __str__() method from the Coin class and run the test program again to see what happens.
Instantiating Many Coin Objects
So far we have just created one instance of our Coin class, but the real power of OOP becomes clear when we create multiple instances (i.e., objects) of a class. Each object will have its own set of instance variables and exist in memory independently of any other objects. This is a very powerful way of reusing code since we can define one class then instantiate as many objects of that class as we need without having to duplicate any code!
Here’s another test program that demonstrates the instantiation of three independent Coin objects in memory at the same time.
|
1 2 3 4 5 6 7 8 9 10 11 12 13 14 15 16 17 18 19 20 21 22 23 24 25 26 27 28 |
import myModule def main(): # Create three objects from the Coin class. coin1 = myModule.Coin("Heads") coin2 = myModule.Coin("Tails") coin3 = myModule.Coin("Heads") # Display the side of each coin that is facing up. print('I have three coins with these sides up:') print( coin1 ) print( coin2 ) print( coin3 ) # Toss all coins. print('\nI am tossing all three coins...\n') coin1.toss() coin2.toss() coin3.toss() # Display the side of each coin that is facing up. print('Now here are the sides that are up:') print( coin1 ) print( coin2 ) print( coin3 ) # Call the main function. main() |
Lines 5, 6, and 7 instantiate three separate Coin objects. The figure below illustrates how the variables coin1, coin2, and coin3reference the three objects in memory once they are created.

Notice that each object has its own independent sideup instance variable. Lines 17, 18, and 19 call each objects’ toss() method. This causes each object to randomly change the value of their independent sideup instance variable. For example, like this:

This ability to create as many objects as we need from one class will be very helpful when we start to design games. For example, you might define one Enemy class and then instantiate as many “bad guy” objects as you need to while your game is running.
Introducing UML Diagrams
As you know from our discussion of flowcharts and IPO diagrams (U1-5), it’s often helpful to be able to visually represent the logic in a program. Professionals use what is known as Unified Modeling Language (UML) diagrams to graphically depict classes.
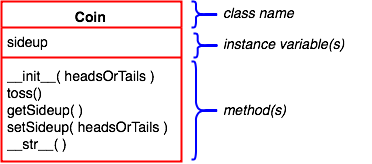
 To the right is the UML diagram for our Coin class. A UML diagram consists of a box with three sections. In the top section, we state the name of the class, in the middle section we list any instance variables and in the bottom section, we list all methods.
Notice that we do not show the self parameter in UML because it is understood that the Python interpreter handles this automatically. UML diagrams are great for giving a snapshot of a class but, as we’ll see next time, they can also help illustrate important relationships between classes.
You Try!
- Start a new page in your Learning Journal titled “4-2 Classes and Objects”. Carefully read the notes above and in your own words summarize the key ideas from each section.