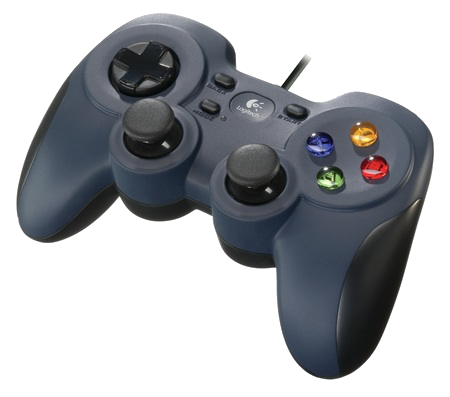
A joystick is an example of an Auxiliary I/O device. Today we’ll learn how to handle joystick input in our games!
 We’re going to use the Logitech Gamepad F310, but Pygame should work with any decent PC-compatible joystick you might have. If you’re familiar with an Xbox controller, the F310 will feel very similar. It has four trigger buttons on the front, four coloured buttons on the top, two clickable mini-joysticks, and an 8-way directional pad (or D-pad). The F310 is both Xbox and PC compatible. On the bottom is a switch labelled “X” (for Xbox mode) and “D” (for PC mode.). Please make sure that it is switched to “D” or the joystick will not work with pygame!
Joystick Detection
Because a joystick is an optional input device we need to do some extra work in the Entities (IDEA) section to detect and initialize them. Let’s start with the IDEA sections:
|
1 2 3 4 5 6 7 8 9 10 11 12 13 14 15 16 17 18 19 20 21 22 23 24 25 26 27 28 29 30 31 32 33 34 |
# I - Import and Initialize import pygame, mySprites pygame.init() def main(): '''This function defines the 'mainline logic' for our game.''' # D - Display screen = pygame.display.set_mode((640, 480)) pygame.display.set_caption("Joystick Detection + Events demo") # E - Entities background = pygame.Surface(screen.get_size()) background.fill((255, 255, 255)) screen.blit(background, (0, 0)) # Create a list of Joystick objects. joysticks = [] for joystick_no in range(pygame.joystick.get_count()): stick = pygame.joystick.Joystick(joystick_no) stick.init() joysticks.append(stick) # Create an initial joystick status message. if joysticks: status = str(joystick_no+1) + "Joystick(s) detected." else: status = "Sorry! No joystick(s) to test." # Instantiate a status Label sprite statusLabel = mySprites.Label(status, (320,240)) allSprites = pygame.sprite.OrderedUpdates(statusLabel) # A - ACTION |
On line 2, we import pygame along with the mySprites.py module (from U4-10) so that we can reuse our Label sprite. Since there may be more than one joystick installed, the code above creates a joysticks list to keep track of any number of Joystickobjects. The pygame.joystick.get_count() function, returns the number of joysticks currently detected, or 0 if none. For each joystick, a Joystick object is instantiated (and given a unique number starting from 0), its init() method is called, and then the Joystick object is appended to our list of joysticks. The if statement checks if the joysticks list is empty or not, and displays an appropriate message in the Python shell.
Joystick Events
Once we have instantiated and initialized our joystick(s) objects, we can detect joystick events much the same way as any other input device. Append the following ALTER code to the IDEA code above:
|
1 2 3 4 5 6 7 8 9 10 11 12 13 14 15 16 17 18 19 20 21 22 23 24 25 26 27 28 29 30 31 32 33 34 35 36 |
# A - Assign clock = pygame.time.Clock() keepGoing = True # L - Loop while keepGoing: # T - Time clock.tick(30) # E- Events for event in pygame.event.get(): if event.type == pygame.QUIT: keepGoing = False elif event.type == pygame.JOYBUTTONDOWN: statusLabel.setText("Joystick #"+str(event.joy) +\ " Button #"+str(event.button) + " Down") elif event.type == pygame.JOYBUTTONUP: statusLabel.setText("Joystick #"+str(event.joy) +\ " Button #"+str(event.button) + " Up") elif event.type == pygame.JOYHATMOTION: statusLabel.setText("Joystick #"+str(event.joy) +\ ", Hat Value #"+str(event.value)) # R - Refresh screen allSprites.clear(screen, background) allSprites.update() allSprites.draw(screen) pygame.display.flip() # Close the game window pygame.quit() # Call the main function main() |
If you look at the Event Handling (ALTER) section, you’ll see the various joystick events that pygame can detect:
pygame.JOYBUTTONDOWN: occurs when a button on a joystick is pressed. The event object includes a joy instance variable to indicate which joystick number caused the event and a button instance variable to specify which button on that joystick was pressed.
pygame.JOYBUTTONUP: occurs when a button on a joystick is released. The event object includes a joy instance variable to indicate which joystick number caused the event and a button instance variable to specify which button on that joystick was released.
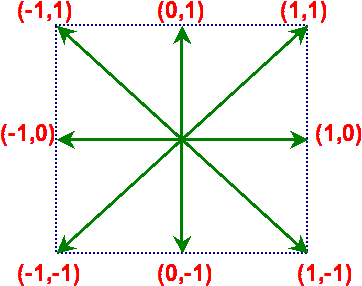
 pygame.JOYHATMOTION: a “hat” is another name for D-pad. This event occurs when the D-pad is pressed in one of eight directions. As above, the event object includes a joy instance variable to indicate which joystick number caused the event, but it also includes a value instance variable which is an (x, y) tuple indicating in which of 8 directions the D-pad was pressed.
A nice feature of the Logitech F310 is that if you press the MODE button, the left mini-joystick and D-pad are swapped so that you can read events from the left mini-joystick as if it were the D-pad.
A Joystick Controlled Sprite
Ok, let’s put all of this together in an example that allows us to control a sprite on the screen. Here is code for a revised Boxsprite class, update your mySprites.py module with it:
|
1 2 3 4 5 6 7 8 9 10 11 12 13 14 15 16 17 18 19 20 21 22 23 24 25 26 27 28 29 30 31 32 33 34 35 36 37 38 39 40 41 42 43 44 45 46 |
class Box(pygame.sprite.Sprite): '''Our Joystick-controlled Box Sprite''' def __init__(self, screen): '''Initializer to set the image, position, and direction for a Box Sprite.''' # Call the parent __init__() method pygame.sprite.Sprite.__init__(self) # Keep track of the screen so we can call get_witdth() self.window = screen # Define a black Surface for our Box Sprite self.image = pygame.Surface((40, 40)) self.image = self.image.convert() self.image.fill((0, 0, 0)) # Set the rect for our Box sprite, as well as direction (dx & dy) self.rect = self.image.get_rect() self.rect.left = 300 self.rect.top = 200 self.dx = 0 self.dy = 0 def changeColour(self, button_num): '''Depending on the joystick button_num (0 -> 11) pressed, an RGB colour tuple is chosen from a list of colours to change the colour of our Box sprite.''' colours = [ (0,0,0),(0,0,111),(0,111,0),(0,111,111), \ (111,0,0),(111,0,111),(111,111,0),(111,111,111),\ (0,0,222),(0,222,0),(222,0,0),(222,222,222) ] self.image.fill(colours[button_num]) def changeDirection(self, xy_change): '''xy_change is an (x,y) tuple used to change the dx and dy directions for our Box sprite.''' self.dx, self.dy = xy_change def update(self): '''Move the Box each frame, but keep within window boundaries.''' if ((self.rect.left > 0) and (self.dx < 0)) or\ ((self.rect.right < self.window.get_width()) and\ (self.dx > 0)): self.rect.left += (self.dx*5) if ((self.rect.top > 0) and (self.dy > 0)) or\ ((self.rect.bottom < self.window.get_height()) and\ (self.dy < 0)): self.rect.top -= (self.dy*5) |
The __init__() method creates a 40×40 pixel black Surface with its top-left corner at (300, 200). We initialize a window instance variable to keep track of the screen (game window) passed in as a parameter to since we’ll need this later in the update()method. We also initialize the dx and dy instance variables to 0 indicating that the box is currently not moving; that is, there is no change in x or y.
The changeColour() method changes the colour of our Box sprite image depending on what button number was pressed. The Logitech F310 has 12 buttons that we can read, so I have predefined a (local variable) list of 12 (R, G, B) colour tuples used to re-fill our Box.
The changeDirection() method takes an (x, y) tuple indicating the direction value of the D-pad. This is convenient because the event.value instance variable of the pygame.JOYHATMOTION event is an (x, y) tuple that we can just pass along to this method. The x and y in this tuple are then broken into their individual components, using multi-valued assignment, and stored in our dx and dy instance variables for use in the update() method.
Finally, the update() method for our Box sprite moves it 5 pixels according to the latest dx and dy values, unless the edge of the screen is reached. Recall that this method will be automatically called by pygame in the Refresh (ALTER) section of our main game loop.
Finally, on to our main demo code!
|
1 2 3 4 5 6 7 8 9 10 11 12 13 14 15 16 17 18 19 20 21 22 23 24 25 26 27 28 29 30 31 32 33 34 35 36 37 38 39 40 41 42 43 44 45 46 47 48 49 50 51 52 53 54 55 56 57 58 59 60 61 62 63 64 65 66 |
# I - Import and Initialize import pygame, mySprites pygame.init() def main(): '''This function defines the 'mainline logic' for our game.''' # Display screen = pygame.display.set_mode((640, 480)) pygame.display.set_caption("Move the rectangle with the joystick!") # Entities # Create a list of Joystick objects. joysticks = [] for joystick_no in range(pygame.joystick.get_count()): stick = pygame.joystick.Joystick(joystick_no) stick.init() joysticks.append(stick) background = pygame.Surface(screen.get_size()) background.fill((255, 255, 255)) screen.blit(background, (0, 0)) # Create a Box sprite object box = mySprites.Box(screen) allSprites = pygame.sprite.OrderedUpdates(box) # ACTION # Assign clock = pygame.time.Clock() keepGoing = True # Hide the mouse pointer pygame.mouse.set_visible(False) # Loop while keepGoing: # Time clock.tick(30) # Events for event in pygame.event.get(): if event.type == pygame.QUIT: keepGoing = False elif event.type == pygame.JOYBUTTONDOWN: box.changeColour(event.button) elif event.type == pygame.JOYHATMOTION: box.changeDirection(event.value) # Refresh screen allSprites.clear(screen, background) allSprites.update() allSprites.draw(screen) pygame.display.flip() # Unhide mouse pointer pygame.mouse.set_visible(True) # Close the game window pygame.quit() # Call the main function main() |
At this point, the code above should be pretty straightforward. On lines 25 and 26 we create our Box sprite and put it into an OrderedUpdates sprite group. Even though we only have one sprite in this example, it’s good practice to use sprite groups.
In the Event Handling (ALTER) section, if a button is pressed (JOYBUTTONDOWN) we get the button number (0 through 11) and pass this into our changeColour() method to change the colour of our Box sprite to one of 12 we pre-defined in a list. If the D-pad is pressed (JOYHATMOTION), then we pass the (x, y) tuple indicating the desired direction into our changeDirection()method.
You Try!
- Start a new page in your Learning Journal titled “4-12 Handling Joystick Events”. Carefully read the notes above and in your own words summarize the key ideas from each section.