What are Arrays?
In exercise 2-7 Q1, I asked you to enhance the Ball class in various ways and then instantiate five unique Ball objects. By now you appreciate how beneficial defining a class is from a code reuse perspective. After defining a class once, you can theoretically create as many objects of that class as you like with just one extra line of code for each.
However, you may have also noticed that each object requires its own variable to refer to it. As we instantiate more and more objects, we’ll need more and more variables. Can you imagine if I asked you to create 1000 Ball objects? You’d need 1000 variables (myBall1, myBall2, … myBall1000), and your draw() function would require 3000 lines of nearly identical code to animate them all! Wouldn’t it be nice if there was an easier way?
This is where arrays come in! An array is like a list of variables that store similar data; for example, we can create an array to store a list of integer values, or a list of references to Ball objects. Here’s an illustration of the differences between a regular variable (myAverage) and an array (myMarks):

You already know that a variable has a name, and can store only one value at a time. An array also has a name but can store many related values. Each value is called an element of the array, and each element is accessed by using an index (integer) value. The index of the first element in an array is always 0 – this is a common source of errors so be careful! In the image above, the array has 5 elements; the index of the first element is 0 and the last is 4.
Working with Arrays
Ok, enough theory, let’s see how this works in actual code. I’ll put all of my code in setup() since we won’t be drawing anything here.
|
1 2 3 4 5 6 7 8 9 10 11 12 13 14 15 16 17 |
function setup() { // Create an empty array let myMarks = [] // Add 5 array elements myMarks[0] = 98 myMarks[1] = 77 myMarks[2] = 48 myMarks[3] = 65 myMarks[4] = 89 // Display one element print("myMarks[1] contains " + myMarks[1]) // Display the entire array contents print("myMarks contains:", myMarks) } |
Line 3, creates an empty array, indicated by empty [ square ] brackets.
After that, lines 6 through 10 demonstrate how you can add elements (i.e., values) to the array using an index (starting from 0). If you don’t start adding elements at index 0, p5.js will automatically fill unused elements of the array with the special value: undefined. You should always avoid having undefined data in your arrays as this can lead to errors. You can also replace existing elements in the same way.
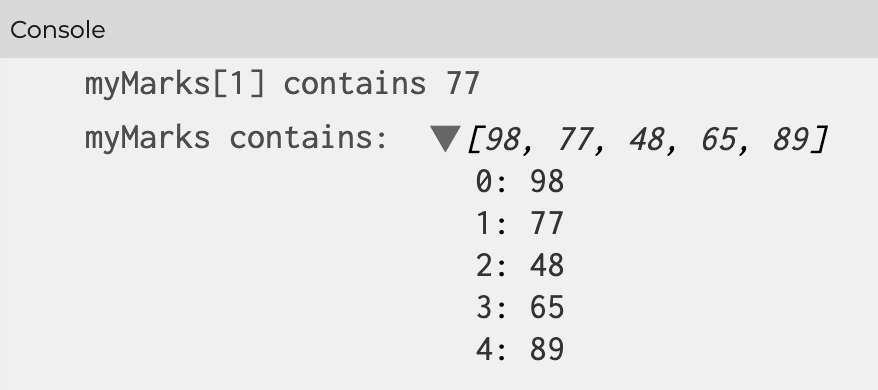
 Line 13 demonstrates how to access (read) one element at a specific index, and line 16 shows how to quickly and easily display all of the elements of the array. Shown to the right is the Console output. If you click the little triangle beside the array you will see the elements displayed vertically (as shown) with their corresponding index values.
But there’s more we can do! Consider this example:
|
1 2 3 4 5 6 7 8 9 10 11 12 13 14 15 16 |
function setup() { // Create and initialize array in 1 step let myMarks = [ 98, 77, 43, 65, 89] // Changing elements myMarks[2] = 84 myMarks[4] = myMarks[4] + 2 // How many elements are in myMarks? print("myMarks has "+ myMarks.length + " elements.") // Using a for loop to display each element: for (let index = 0; index < myMarks.length; index++) { print("myMarks["+index+"] -->", myMarks[index]) } } |
Line 3 demonstrates how you can declare and initialize the elements of an array all on 1 line.
Lines 6 and 7 show how you can change elements in an array using their index. As shown, you can even use array elements in calculations as you would any other variable.
 Arrays in p5.js have a special property called length which automatically keeps track of the number of elements in an array. Line 10 shows how this can be used (dot notation is required).
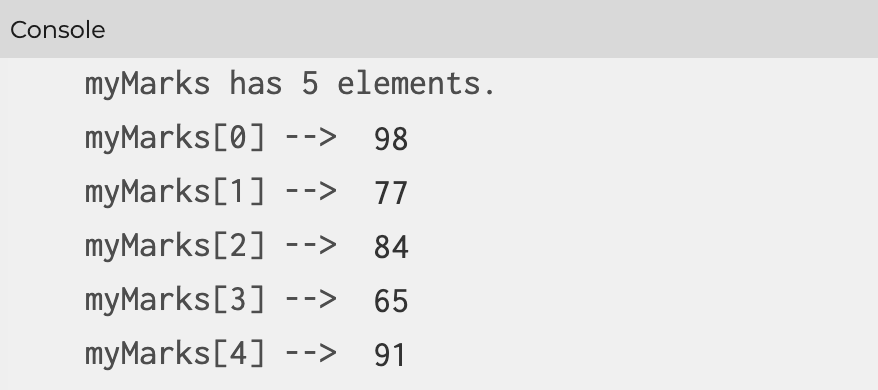
A big benefit of arrays is realized once you start using them with loops. Since the number of elements in an array is known (i.e., the length property), a for loop is perfect for processing array data. Lines 13 through 15 show how you can use a for loop to print() each element of an array individually.
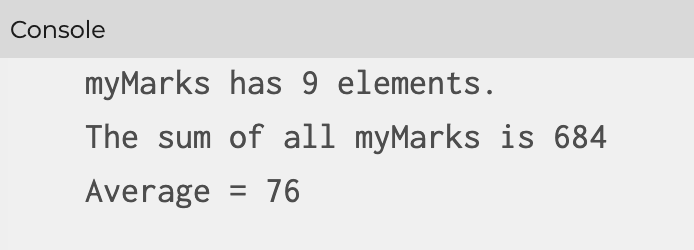
 Here’s another example, this time we’ll use a for loop to calculate the sum of 9 marks and display the average (output shown to the right).
|
1 2 3 4 5 6 7 8 9 10 11 12 13 14 15 |
function setup() { // Create an array of 9 marks let myMarks = [ 98, 77, 43, 65, 89, 56, 82, 100, 74 ] let total = 0 // Use a for loop to calculate the sum of the marks for (let index = 0; index < myMarks.length; index++) { total = total + myMarks[index] } // Display myMarks Report print("myMarks has "+ myMarks.length + " elements.") print("The sum of all myMarks is " + total) print("Average = " + total / myMarks.length) } |
Appending to an Array
In the first example in this lesson, I added elements to an array using an index. But there is a more convenient way of adding elements to an array without needing to remember which index to fill next, it’s called the append() function. Here’s a quick example:
|
1 2 3 4 5 6 7 8 9 10 11 12 13 14 15 |
function setup() { // Create an empty array let myMarks = [] // Add 10 random marks for (let count = 0; count < 10; count++) { append(myMarks, int(random(100))) } // Display the last element print("myMarks[9] contains " + myMarks[9]) // Display the entire array contents print("myMarks contains:", myMarks) } |
On line 6 we have a for loop that repeats exactly 10 times; count will go from 0 to 9, inclusive. Each time the loop iterates, we call the append() function passing in the myMarks array as the first argument, and the element we’d like to add/append as the second argument. In this case, I’m randomly generating an integer from 0 to 100.
 An example console output of this program is shown to the right. Note that the output you see will be similar but different since the code is generating random values.
A Graphical Example
 Let’s make an interactive “smoke trail” animation by having a trail of 50 ellipses follow the mouse pointer. Without arrays and loops, this would be impossible to do efficiently.
We start by declaring 2 arrays, one to keep track of the x coordinates, and one for the y coordinates for each ellipse that will make up the trail of smoke. For convenience, I’ve made these global arrays, but next time we’ll improve this by using OOP.
|
1 2 3 |
// x and y positions for smoke trail parts let xPos = [] let yPos = [] |
Next, in the setup() function I initialize 50 (x,y) coordinates with 0 since there has not been any mouse movement yet. Note that the index of the first element of each array will be 0, and the last (50th) element will be at index 49.
|
1 2 3 4 5 6 7 8 9 10 |
function setup() { createCanvas(400, 400) noStroke() // Initialize all array elements to 0 for (let index = 0; index < 50; index++) { xPos[index] = 0 yPos[index] = 0 } } |
The draw() function is where things get more interesting. Each time that draw() is called we want to keep track of the previous 49 (x,y) positions of the mouse. To do this we need to shift all of the elements of the array to the left one index. This is happening on lines 5 through 8 below. As all of the elements shift left one index in the array, the first element of each array will be overwritten. After this for loop, we store the current mouse position as the last element of the array (i.e., at index 49); this happens on lines 11 and 12.
|
1 2 3 4 5 6 7 8 9 10 11 12 13 14 15 16 17 18 19 20 21 |
function draw() { background(220) // Shift array values for (let index = 0; index < xPos.length-1; index++) { xPos[index] = xPos[index+1] yPos[index] = yPos[index+1] } // Store current mouse location as the last element in the array xPos[xPos.length-1] = mouseX yPos[yPos.length-1] = mouseY // Draw all of the smoke trail parts for (let index = 0; index < xPos.length; index++) { // Draw an ellipse for each element in the array // Colour and size are tied to the loop counter fill(255 - index*5) ellipse(xPos[index], yPos[index], index, index) } } |
Finally, the last for loop goes through the 50 (x,y) coordinates to draw a series of circles. I am using the value of index (our loop counter variable) to control the fill colour and size of the ellipses to make it look fancy! This means that elements at the start of the array will be drawn smaller and a lighter shade of grey, and newer coordinates will be drawn with a larger diameter and darker grey.
You Try!
- Given the following p5.js array:
numbers = [ 7, 3, 0, 1, 8, 2, 9, 5, 4, 6 ] Write separate programs that perform the following tasks:
- Square each element in the array and display the changed array; i.e., the array should become [ 49, 9, 0, 1, 64, 4, 81, 25, 16, 36 ]
- Add a random integer between 1 and 10 to each element, and display the changed array. Results will vary here, but the elements should not include any floating-point values.
- Add each value to the value that follows in the array, skipping the last element. Display the changed array; i.e., [ 10, 3, 1, 9, 10, 11, 14, 9, 10, 6]
- Shift all of the elements to the left one position, and move the first element to the end of the array. Display the changed array; i.e., [ 3, 0, 1, 8, 2, 9, 5, 4, 6, 7 ]
- Extra Challenge: Modify the smoke trail example to look more like a snake. Try to use alpha to control the fading of the body parts of the snake this time. Can you figure out how to draw a face on the snake?
